Dirigido a laboratorios dentales, clínicas, distribuidores y equipos de aprovisionamiento que deseen comparar coronas de circonio, coronas de disilicato de litio, carillas, servicios OEM o pedidos al por mayor de restauraciones.
Indícanos el tipo de producto, el material, el volumen mensual, el país de destino y si deseas solicitar una muestra, para que nuestro equipo de ventas pueda preparar el siguiente paso adecuado.
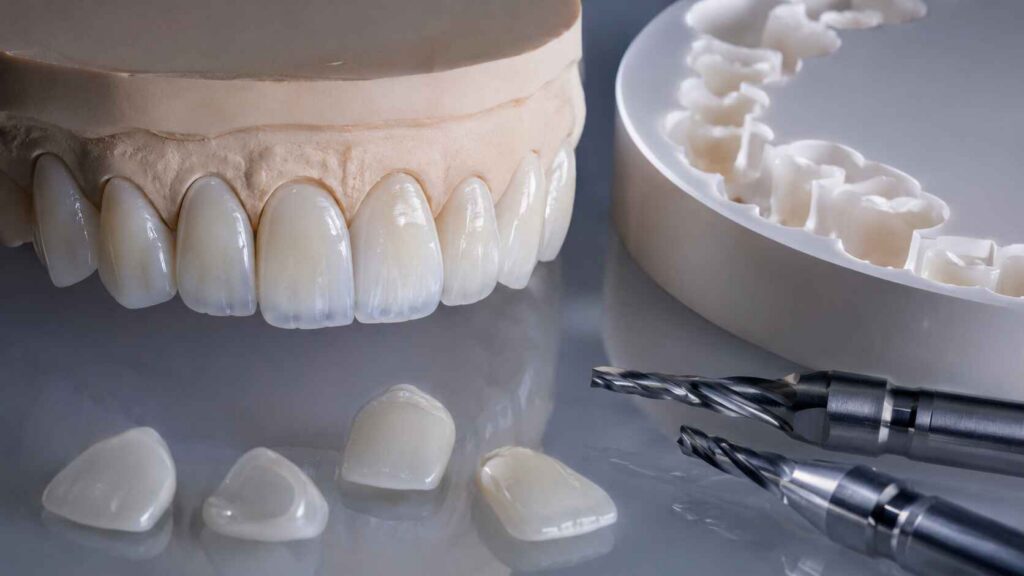
Encaje de carillas de circonio en piezas en bruto multicapa
La postura determina los resultados.
Un técnico puede diseñar una carilla de circonio convincente en CAD, mantener el contorno facial deseado, respetar el grosor mínimo y, aun así, obtener un resultado óptico que no alcance el objetivo clínico, simplemente porque la restauración se ha encajado en la parte incorrecta de un bloque de circonio multicapa.
Entonces, ¿por qué a veces se considera que la organización de la corte es el paso aburrido entre el CAD y el fresado?
Yo no lo vería así.
Para la parte anterior carillas de circonio, el encaje es, en parte, una cuestión de selección de materiales, en parte de control del tono y, en parte, de ingeniería de fabricación. Las modernas piezas en bruto de circonio multicapa pueden presentar gradientes de color desde la zona cervical hasta la incisal, gradientes de translucidez, gradientes de composición o combinaciones de los tres. Al desplazar una carilla verticalmente a través de esa pieza en bruto, cambia la proporción de esas regiones que pasa a formar parte de la restauración final.
Pero esta historia tiene otra cara.
No todas las circonias multicapa se comportan de la misma manera.
Y ahí es donde los consejos simplistas meten a los laboratorios en problemas.
La circonia multicapa no es un material con bonitas rayas
La frase circonia multicapa parece más estandarizado de lo que realmente es.
Algunas piezas en bruto de circonio crean principalmente una transición policromática, al tiempo que mantienen una composición química relativamente uniforme. Otras combinan diferentes composiciones de circonio estabilizado con itria, lo que permite al fabricante modificar la translucidez y el comportamiento mecánico desde el cuerpo hacia la zona del esmalte.
La circonita, en sí misma, está compuesta principalmente por dióxido de circonio, ZrO₂.
La zirconia dental tradicional de alta resistencia se ha asociado habitualmente con la zirconia tetragonal estabilizada con itria al 3 mol%, mientras que las generaciones más translúcidas pueden utilizar formulaciones con aproximadamente un 4 mol% o un 5 mol% de itria. Aumentar el contenido de la fase cúbica puede mejorar la transmisión de la luz, pero no se puede ignorar sin más la contrapartida mecánica.
Una revisión sistemática sobre las circonias translúcidas modernas describe claramente esta evolución. En ella se distingue entre los productos multicapa con composiciones relativamente uniformes y los sistemas híbridos multicapa, en los que las capas varían en cuanto a composición, cromaticidad y opacidad. La misma revisión señala que las generaciones más recientes y translúcidas suelen sacrificar parte de la resistencia mecánica a cambio de un mejor comportamiento óptico. Revisión sistemática de los materiales recientes de circonio translúcido
Esto tiene importancia inmediata para Encaje de carillas de circonio.
Un técnico no se limita a decidir dónde encaja de forma más rentable un archivo STL digital dentro de un disco.
Es posible que el técnico esté decidiendo qué zona del material se convertirá en el tercio incisal.
Circonia multicapa de color frente a circonia con gradiente de resistencia
Antes de anidar las piezas en bruto multicapa, las clasificaría en dos categorías prácticas.
Comportamiento de las piezas en bruto multicapa
Lo que cambia a través del espacio en blanco
Principal motivo de preocupación en relación con la anidación
Lo que comprobaría
Multicapa policromática
Principalmente transición de croma y valor
Distribución del color desde la zona cervical hasta la incisal
Mapa de capas del fabricante y altura de restauración
Multicapa con gradiente de translucidez
Variaciones en la transmisión de la luz entre zonas
Vitalidad incisal y enmascaramiento
Proporción prevista de la zona de esmalte
Multicapa con gradiente de resistencia
La concentración de ítria, la composición de fases y las propiedades mecánicas pueden variar
Áreas funcionales delgadas y colocación incisal
Datos exactos sobre las instrucciones de uso del material y la resistencia de las capas
Degradado híbrido de color y intensidad
El color, la translucidez y la composición cambian
Posicionamiento óptico y mecánico simultáneo
Recomendaciones de apilamiento específicas para cada marca
Multicapa de composición uniforme
La transición cromática es predominante, mientras que la química se mantiene relativamente constante
La estética prima sobre la resistencia
Mapa de degradado de sombras
Esa última distinción es importante.
“Multicapa” no significa automáticamente “gradiente de resistencia”.”
Tampoco significa que todas las regiones cervicales sean notablemente más fuertes que todas las regiones incisales.
Si un operador de CAD/CAM da por hecho lo contrario, no está aplicando una técnica de anidamiento basada en la evidencia. Simplemente está haciendo conjeturas.
Para los profesionales clínicos que deben decidir si la zirconia es una opción válida para el caso, el laboratorio dental Artist Dental Lab ofrece Proceso de trabajo para las carillas de circonio en los dientes anteriores presenta la zirconia de alta translucidez como un material específico para la zona anterior, en la que hay que tener en cuenta de forma conjunta la resistencia, el control del color, el ajuste digital y los requisitos estéticos.
Esa decisión debe tomarse antes de que el archivo de fresado llegue a la pantalla de anidamiento.
El borde incisal no debe situarse automáticamente en la parte más alta del bloque
Probablemente, esta sea la regla más repetida en el anidamiento multicapa:
“Coloca el borde incisal en la capa translúcida”.”
Desde ese punto de vista, eso suele tener sentido.
¿Como instrucción general?
No.
Lo correcto Colocación de carillas en circonio multicapa Depende del croma cervical deseado, la translucidez incisal, la altura de la restauración, el grosor de la carilla, el color del muñón subyacente, la dentición opuesta y el gradiente óptico exacto incorporado en el producto de circonio.
Un incisivo central joven con un borde translúcido visible no presenta las mismas características ópticas que un incisivo lateral desgastado en un paciente de 65 años.
Sin embargo, el programa de anidamiento detecta dos archivos STL.
El técnico tiene que examinar dos dientes.
Piensa en tercios, no solo en la altura del diente
En el caso de las carillas de circonio en la zona anterior, yo dividiría mentalmente la restauración en:
tercio cervical;
tercio central;
tercio incisal.
A continuación, compara esos tercios con el diagrama en blanco de las capas del fabricante.
La región cervical suele necesitar suficiente cromaticidad y enmascaramiento para evitar que parezca decolorada o hueca cerca de la encía.
El tercio central suele aportar gran parte del color corporal percibido y del valor facial.
Es posible que el tercio incisal requiera una mayor translucidez, pero “más” no significa automáticamente “mejor”.”
Esto es especialmente importante en el caso de las carillas finas.
El análisis de Artist Dental Lab sobre Control del valor en la estética de las carillas plantea la misma cuestión general: un código de color VITA no indica la distribución de los valores, la influencia del muñón, el grosor de la cerámica, la translucidez, la textura de la superficie ni los efectos del cemento.
El anidamiento no puede subsanar la falta de información clínica.
Pero puede potenciarlo.
La investigación complica la sencilla teoría de la anidación
Aquí es donde la cosa se pone interesante.
Un estudio de 2023 del Departamento de Prostodoncia de la Universidad de Chiang Mai evaluó 100 muestras de circonio de varias capas ultratranslúcidas, utilizando cuatro posiciones CAD/CAM y espesores de 1,0; 1,5; 2,0; 2,5 y 3,0 mm.
Los investigadores esperaban que la posición y la composición multicapa fueran factores importantes.
El grosor, sin duda.
Pero en diferentes puestos de CAD/CAM sí que no mostraron una diferencia estadísticamente significativa en el ΔE global dentro de los grupos de igual espesor para el sistema de circonio sometido a ensayo. Los autores concluyeron que, para ese material y diseño experimental concretos, el espesor influía en el color final de forma más marcada que la posición vertical.
Léelo con atención.
Sí, es así no demostrar que la colocación de las restauraciones de circonio nunca influye.
Esto demuestra que los laboratorios deberían dejar de convertir una hipótesis sobre el gradiente, específica de una marca, en una ley universal.
Y hay otra serie de pruebas que dejan aún más clara esa limitación.
Algunos bloques con gradiente de resistencia realmente varían de una capa a otra
En un estudio en el que se investigó la circonia multicapa con gradiente de resistencia, se midieron la composición, la translucidez, la estructura de fases y las propiedades de flexión en diferentes zonas.
Las cifras no dejaban lugar a dudas.
En el caso de un sistema YML sometido a ensayo, la resistencia a la flexión característica en cuatro puntos fue aproximadamente de:
923 MPa en la capa 2 del cuerpo;
911 MPa en la capa 3 del cuerpo;
634 MPa en la capa de esmalte.
Otro material multicapa Prime:
aproximadamente 989 MPa en el cuerpo;
693 MPa en la zona de transición;
535 MPa en la zona del esmalte.
Las capas de esmalte contenían más circonita, lo que aumentaba la translucidez y reducía la resistencia a la flexión.
Por eso no me gustan las instrucciones genéricas como:
“Mueve cada carilla hacia arriba para conseguir una mayor translucidez”.”
¿Hacia arriba en qué espacio en blanco?
¿En qué composición?
¿Con qué grosor de cerámica?
¿Y dónde quedará la zona incisal funcional?
Esas son las preguntas útiles.
El grosor puede anular la posición de anidamiento que creías haber elegido
La cerámica fina no perdona.
Una carilla de circonio no presenta las mismas características ópticas que una corona de circonio de 1,5 mm, simplemente porque ambas se han fresado a partir del mismo bloque multicapa A1.
Un estudio que analiza la circonia multicapa en 1,0 y 1,5 mm señalaron que al reducir el grosor de 1,5 mm a 1,0 mm, el parámetro de translucidez aumentaba en aproximadamente entre 1,2 y 1,5 veces, dependiendo de las condiciones en las que se haya realizado la prueba.
La temperatura de sinterización también fue un factor importante: se estudiaron muestras a 1350 °C, 1450 °C y 1600 °C, y se observó que las temperaturas más altas se asociaban con tamaños de grano mayores y cambios en la translucidez.
Esto debería hacer que cualquier técnico se muestre cauteloso a la hora de resolver un problema óptico exclusivamente en el software de anidamiento.
El grosor de la cerámica forma parte de la fórmula del color.
Lo mismo ocurre con el sustrato.
Lo mismo ocurre con la sinterización.
Lo mismo ocurre con el tratamiento superficial final.
Las carillas ultradelgadas de circonio añaden el tono del cemento a la ecuación
Otra investigación inventada 90 muestras de circonio de varias capas ultratranslúcidas de 0,5 y 0,7 mm y los evaluamos con cinco tonos de cemento de resina Panavia V5: universal, transparente, marrón, blanco y opaco.
El objetivo era sencillo: determinar cómo el grosor de la carilla y el tono del cemento de resina influyen en el color final.
Y precisamente por eso, una “pieza en bruto de circonio A1” nunca constituye una prescripción óptica completa para una carilla fina.
Por lo tanto, en un caso anterior complejo, quiero conocer el color del muñón antes de finalizar el encaje.
¿No da sombra el tocón?
Entonces estamos tomando una decisión de fabricación sin tener en cuenta una de las variables ópticas que determinan el resultado final.
Laboratorio dental Artist Guía de correspondencia de colores entre la zirconia y E.max muestra por qué esto resulta aún más complicado en el caso de las restauraciones de disilicato de litio: el ZrO₂ y el Li₂Si₂O₅ no transmiten ni difuminan la luz de la misma manera, incluso cuando la prescripción indica que ambas unidades son “A1”.”
Cómo encajaría las carillas de circonio en una pieza en bruto multicapa
Yo no empezaría a subir los archivos hasta que los incisivos parecieran estar situados en la capa de esmalte.
Yo utilizaría una secuencia controlada.
1. Identificar el sistema de circonio exacto
Antes agrupación de piezas dentales mediante CAD/CAM, registro:
fabricante;
familia de productos;
sombra;
generación de circonio;
espesor del disco;
si la pieza en bruto es únicamente policromática o presenta un degradado de composición;
programa de sinterización;
porcentajes de esmalte y capa de base indicados por el fabricante.
“La indicación ”circonia 5Y» sigue sin ser suficiente si el fabricante ha diseñado un degradado exclusivo.
2. Digitaliza el diente clínico, no solo el archivo STL
Pregunta qué es lo que se pretende reproducir con la restauración.
Para cada chapa, determina:
croma cervical requerido;
valor del tercio medio objetivo;
translucidez incisal deseada;
sombra del tocón;
espesor mínimo y máximo de la cerámica;
cantidad de enmascaramiento necesaria;
patrón óptico del diente adyacente.
Laboratorio dental Artist Guía de especificaciones para la compra de chapas de madera recomienda documentar el tono, los tonos de cada muñón, el carácter incisal, la textura, las fotografías, las referencias provisionales aprobadas y otros datos, precisamente porque un archivo STL por sí solo no permite transmitir estas decisiones.
Estoy de acuerdo con la lógica del flujo de trabajo.
No se debe obligar al operador del CAM a idear la prescripción estética durante el anidamiento.
3. Empieza por la zona de anidamiento nominal indicada por el fabricante
Utiliza el diagrama de capas que se proporciona para la pieza en bruto específica de circonio multicapa.
Esa es la posición de partida.
No es la decisión definitiva.
Si el fabricante indica una distribución definida entre el cuerpo y el esmalte para las restauraciones anteriores, respétala, salvo que exista una razón documentada para no hacerlo.
4. Coloca primero el tercio cervical
Presto más atención a la región cervical que muchos otros profesionales.
¿Por qué?
Porque un tercio cervical excesivamente translúcido puede dejar al descubierto una influencia indeseada del muñón y hacer que la carilla adquiera un aspecto grisáceo o débil cerca de la encía.
En el caso de un muñón normal, puede bastar con un enmascaramiento cervical moderado.
En el caso de una preparación más oscura, desplazar excesivamente toda la carilla hacia la zona del esmalte con el único fin de dar vitalidad al borde incisal puede provocar un nuevo problema cervical.
5. Comprueba dónde queda el borde incisal
Ahora examina la zona incisal.
El objetivo no es la máxima transparencia.
El objetivo es lograr una transmisión y un reflejo creíbles para ese paciente.
Un incisivo joven y sin desgastar puede justificar un gradiente más pronunciado.
Un diente más viejo con un borde opaco, pulido y desgastado puede requerir mucho menos tratamiento.
Y si el diseño CAD ya incluye una región incisal delgada, recuerda que el propio grosor puede aumentar considerablemente la translucidez.
6. Comparar todas las unidades como un grupo
Aquí es donde Posicionamiento de restauraciones de circonio a menudo falla en los casos de recubrimientos de varias unidades.
Los técnicos optimizan cada chapa de forma individual.
Entonces, las seis unidades ya no comparten un gradiente coherente.
En el caso de #6–#11, quiero comparar:
posición vertical en la pieza en bruto;
exposición de la capa cervical;
exposición de la capa incisal;
mapas de espesor;
longitud final del diente;
simetría contralateral.
No des por sentado que todas las restauraciones deban ocupar exactamente la misma posición absoluta en el eje Z.
Un incisivo lateral y un incisivo central pueden tener longitudes diferentes.
Lo importante es reproducir la proporción óptica deseada.
7. Protección de áreas funcionales delgadas en materiales con gradiente de resistencia
Si la pieza en bruto cambia de composición a lo largo de su altura, no intentes conseguir translucidez sin comprobar primero las consecuencias mecánicas.
Recuerda el estudio sobre el gradiente de fuerza.
En los materiales analizados se observaron zonas de esmalte con valores de aproximadamente 535-634 MPa y regiones del cuerpo con valores de aproximadamente 911-989 MPa.
Eso no significa que una capa de 535 MPa sea automáticamente inadecuada para un revestimiento.
Significa que las capas son sustancialmente diferentes.
El diseño clínico, el grosor, la adhesión, la oclusión, el soporte de la preparación y las indicaciones del fabricante siguen siendo factores determinantes a la hora de decidir si un caso es adecuado.
8. Guarda la captura de pantalla anidada junto con el caso
Esto suena aburrido.
Hazlo de todos modos.
Para las carillas de circonio de alta estética, archivaría lo siguiente:
Versión CAD;
marca y lote en blanco;
sombra de disco;
espesor del disco;
captura de pantalla anidada;
posición vertical;
ciclo de sinterización;
registro de tintes/barnices;
evaluación final del tono.
Si hay que volver a fabricar una unidad seis meses después, esa información tiene mucho más valor que “circonia multicapa A1 usada”.”
La reproducibilidad forma parte del control de calidad.
Errores habituales al encajar las carillas de circonio
Error n.º 1: Colocar todos los bordes incisales en la posición más alta posible
Que sea más translúcido no significa automáticamente que sea más natural.
Puedes acabar con zonas incisales grisáceas, un enmascaramiento deficiente o una transición óptica que no se asemeje a la dentición adyacente.
Error n.º 2: Dar por sentado que todas las piezas en bruto multicapa tienen el mismo gradiente
Algunas piezas en bruto están compuestas principalmente por materiales con degradado de color.
Otros combinan variaciones en la cromaticidad, la translucidez, el contenido de itria y la resistencia.
Los datos específicos de cada fabricante son importantes.
Error n.º 3: No tener en cuenta el grosor del revestimiento
Entre 0,5 y 0,7 mm, los efectos del sustrato y del cemento cobran mucha más importancia que en una restauración más gruesa.
Un pequeño cambio en el grosor puede alterar el comportamiento de la luz lo suficiente como para influir negativamente en la decisión de anidación.
Error n.º 4: Basarse únicamente en el código de sombra para la disposición de los edificios
“A1” no es un plano óptico.
No le indica al técnico:
valor residual;
saturación cervical;
transparencia incisal;
espesor del esmalte;
fluorescencia del diente adyacente;
tono cemento;
uso obligatorio de mascarilla.
Error n.º 5: Optimizar el rendimiento del disco antes que la estética
Sí, la circonia cuesta dinero.
Lo mismo ocurre con los remakes.
Prefiero perder unos pocos puntos porcentuales de aprovechamiento del disco antes que girar y comprimir las carillas anteriores hasta colocarlas en posiciones que afecten a su aspecto, solo para poder encajar una unidad más en el disco.
La lógica económica es sencilla.
Un diente que se ha podido salvar sale más barato que un caso fallido de «sonrisa de seis unidades».
Error n.º 6: Olvidarse de lo que ocurre después del fresado
La restauración aún tiene que realizarse:
separados;
terminado;
sinterizado;
caracterizado;
pulido o esmaltado;
en garantía;
ajustado en función de.
La óptica sigue cambiando tras el CAM.
Una investigación realizada en 2023 sobre tres circonias multicapa reveló que el pulido, el esmaltado y el envejecimiento artificial podían influir en las propiedades ópticas y producir cambios de color perceptibles en algunos de los grupos analizados.
Por eso nunca evaluaría el encaje basándome únicamente en una vista previa del disco sin sinterizar.
Se trata de una fase intermedia de fabricación.
No es el último diente.
La mejor posición para las carillas de circonio multicapa depende de cada caso concreto
Si alguien me preguntara: “¿Qué porcentaje de la carilla debe quedar dentro de la capa de esmalte?”, me resistiría a darle una cifra válida para todos los casos.
Esa respuesta parecería útil.
También podría ser incorrecto.
La mejor posición depende de:
el sistema exacto de circonio multicapa;
ya sea que su degradado sea óptico, compositivo o ambos;
altura de restauración;
espesor de la cerámica;
sombra del tocón;
tono cemento;
dientes adyacentes;
uso obligatorio de mascarilla;
caracterización incisal;
riesgo funcional.
Un estudio espectrofotométrico muy reciente sobre tres sistemas de circonio multicapa pone de manifiesto hasta qué punto esto puede depender del producto concreto. El tipo de material y la región anatómica influyeron de manera significativa en los parámetros ópticos, mientras que la región incisal presentó la mayor translucidez registrada en las coronas analizadas.
La lección no es “colocar siempre el tercio incisal más arriba”.”
La lección es:
Conoce la pieza en bruto que vas a fresar.
A continuación, coloca la restauración con cuidado.
Lo que ocurre tras el encaje sigue siendo determinante para que la chapa funcione
Un buen anidamiento no compensa una mala preparación.
No sirve para arreglar las fotos malas.
No recupera los tonos de los tocones que faltan.
Y, desde luego, no soluciona los problemas de unión o oclusión no controlados.
Una vez fabricadas las carillas de circonio, el tratamiento superficial específico del material es importante, ya que el ZrO₂ es una cerámica policristalina y no una cerámica vítrea rica en sílice. El laboratorio dental Artist Dental Lab’s Parámetros de abrasión con aire para carillas de circonio explica por qué se deben documentar el tamaño de las partículas, la presión, la distancia, la duración del tratamiento y la composición de la zirconia, en lugar de limitarse a escribir la vaga indicación “chorro de arena con zirconia”.”
Tras la cementación, la función pasa a ser el siguiente punto de control.
El sitio web Protocolo oclusal tras la cementación para casos con múltiples carillas Esto resulta especialmente relevante en el caso de las restauraciones anteriores delgadas, ya que una zona incisal bien adaptada puede acabar convirtiéndose en una zona funcional inadecuada si el contorno final provoca un contacto protrusivo o lateral no deseado.
Una sintaxis bien estructurada no es el objetivo final.
Es un paso controlado del sistema.
Preguntas frecuentes
¿Qué es el encaje de carillas de circonio?
El encaje de carillas de circonio es el proceso CAD/CAM que consiste en colocar una carilla diseñada digitalmente dentro de una pieza en bruto de circonio presinterizada, de modo que la restauración presente la combinación deseada de color, translucidez, grosor del material, holgura de fabricación y—cuando se utiliza circonia con gradiente de composición— la distribución adecuada de las diferentes capas mecánicas y ópticas del bloque.
En el caso de los materiales monocapa, el anidamiento tiene que ver principalmente con la eficiencia en la fabricación y la orientación del fresado.
En el caso de la zirconia multicapa, la posición vertical también puede ser una decisión tanto estética como relacionada con el material.
¿Cómo se encajan las carillas de circonio en las piezas en bruto multicapa?
Para encajar las carillas de circonio en bloques multicapa, primero hay que identificar la estructura de capas del fabricante; a continuación, hay que alinear los tercios cervical, corporal e incisal de la restauración con las zonas de croma y translucidez previstas, al tiempo que se comprueban el grosor de la carilla, el color del muñón, los dientes adyacentes, las áreas funcionales, el margen de fresado y cualquier gradiente de resistencia especificado para ese sistema de circonio.
Yo partiría de la postura recomendada por el fabricante y solo la modificaría cuando los antecedentes del caso lo justifiquen.
No muevas todas las láminas hacia arriba por costumbre.
¿Cuál es la mejor posición para las carillas en zirconia multicapa?
La mejor posición para las carillas de circonio multicapa es la ubicación vertical que reproduce el croma cervical deseado por el paciente, el valor del cuerpo, la translucidez incisal, los requisitos de enmascaramiento y el diseño funcional deseados por el paciente, respetando al mismo tiempo la estructura por capas y las indicaciones del fabricante relativas al bloque de circonio concreto, en lugar de basarse en un porcentaje universal de esmalte a dentina.
En el caso de algunos materiales, el cambio de posición puede influir considerablemente en el gradiente incorporado a la restauración.
En otros casos, los datos publicados sugieren que el grosor puede influir en el color general más que la posición vertical CAD/CAM.
¿Influye la posición de encaje en el color de las carillas de circonio multicapa?
La posición de encaje puede alterar la distribución del color en las carillas de circonio multicapa, ya que las distintas regiones verticales pueden presentar características diferentes en cuanto a cromaticidad o translucidez; sin embargo, la magnitud de ese efecto depende del material concreto. En un estudio realizado con un sistema ultratranslúcido no se observaron diferencias significativas en el valor ΔE global entre las distintas posiciones CAD/CAM cuando el grosor de las muestras se mantenía constante.
Ese resultado es importante porque nos impide dar demasiada importancia al anidamiento, como si fuera el único factor que determina el tono final.
El espesor, el sustrato, el cemento y el acabado siguen siendo variables fundamentales.
¿La zirconia multicapa presenta una resistencia diferente en cada capa?
Algunos sistemas de circonio multicapa presentan una resistencia diferente en cada capa, ya que los fabricantes varían la concentración de itria y la composición de las fases a lo largo de la pieza en bruto para combinar una zona de esmalte más translúcida con zonas del cuerpo más resistentes, mientras que otras circonias multicapa policromáticas mantienen una composición más uniforme y crean principalmente un degradado de color.
Los estudios publicados sobre el gradiente de resistencia indicaban que las capas de esmalte presentaban valores de entre 535 y 634 MPa, y las regiones del cuerpo, de entre 911 y 989 MPa, en los sistemas específicos de circonio analizados.
Esas cifras no deben aplicarse sin más a otras marcas.
¿Debe colocarse siempre el borde incisal en la capa de circonio más translúcida?
El borde incisal no debe situarse automáticamente en la capa de circonio más translúcida, ya que una translucidez excesiva puede reducir el efecto de enmascaramiento, aumentar la influencia del sustrato, crear un aspecto grisáceo o desplazar la cerámica funcional fina a una zona de composición diferente; en su lugar, la posición deseada debe reproducir la óptica incisal real del paciente y respetar el diseño específico del bloque.
El esmalte joven, el esmalte desgastado, las preparaciones descoloridas y las restauraciones adyacentes de E.max pueden requerir estrategias diferentes.
«Natural» no significa «máximamente translúcido».
¿Es más importante el grosor de la chapa que la posición de encaje?
El grosor de la carilla puede ser tan importante como la posición de encaje, o incluso más, ya que al variar el grosor de la zirconia se altera la transmisión de la luz, el enmascaramiento y la contribución del diente subyacente y del cemento de resina; en un estudio de 2023 sobre circonia multicapa, el grosor afectó significativamente al color, mientras que las diferentes posiciones CAD/CAM no modificaron de forma significativa el ΔE global con el mismo grosor.
Eso no significa que el anidamiento no sea relevante.
Esto significa que los técnicos deben evaluar conjuntamente el mapa de espesor y la posición del espacio en blanco vertical, en lugar de tratarlos como decisiones independientes.
Envía datos de mejor calidad antes de que la chapa llegue al CAM
No envíes un caso de carillas de circonio solo con un archivo STL y la indicación “A1”.”
Envía la información que realmente determina el resultado.
Incluye escaneos de arcada completa, escaneo de la arcada opuesta, oclusión verificada, detalles de la preparación, color definitivo, colores de los muñones individuales, fotografías con retracción de los labios, fotografías de la sonrisa, referencias de los dientes adyacentes, valor y translucidez deseados, diseño provisional o de la sonrisa aprobado, y cualquier restricción funcional que el técnico deba tener en cuenta.
Entonces, adapta la pieza en bruto de circonio multicapa al paciente, y no al revés.
Para casos anteriores complejos carillas de circonio, casos de CAD/CAM de un solo diente o de varias unidades en los que sea necesario planificar el posicionamiento de los bloques y el control óptico antes del fresado, envíe el caso digital completo a Artist Dental Lab para que se revise el material y se planifique la fabricación.
Un técnico puede desplazar una chapa varios milímetros hacia el interior de una pieza en bruto en cuestión de segundos.