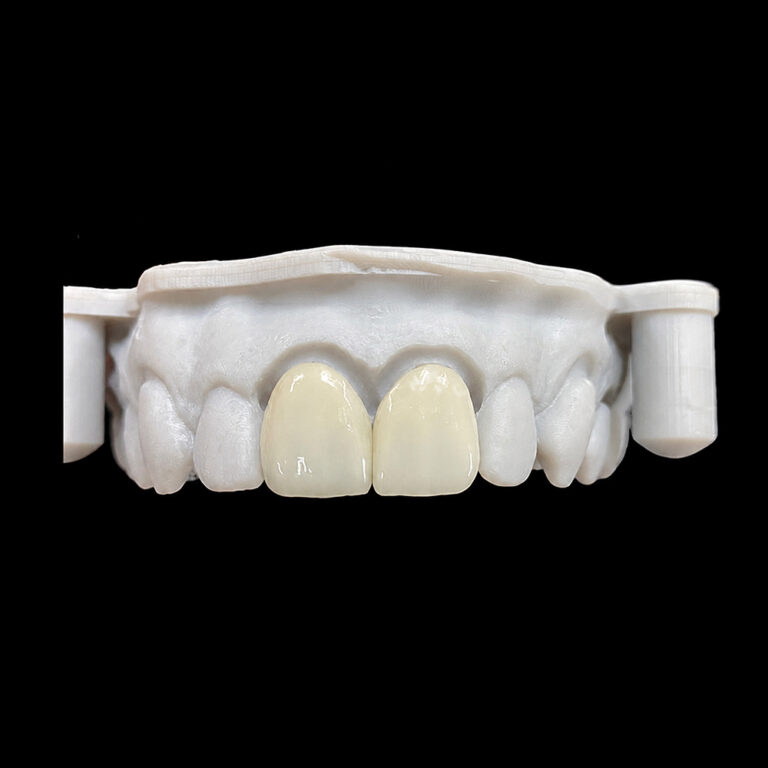
للمختبرات السنية والعيادات والموزعين وفرق التوريد التي تقارن بين تيجان الزركونيا وتيجان ثاني أكسيد الليثيوم والقشور وخدمات التصنيع حسب الطلب (OEM) أو طلبات الترميم بالجملة.
يرجى إطلاعنا على نوع المنتج، والمواد المستخدمة، وحجم المبيعات الشهري، وبلد المقصد، وطلب العينات، حتى يتمكن فريق المبيعات لدينا من تحديد الخطوة التالية المناسبة.
لماذا تعتبر القيمة أكثر أهمية من علامة التدرج اللوني في جماليات الفينير
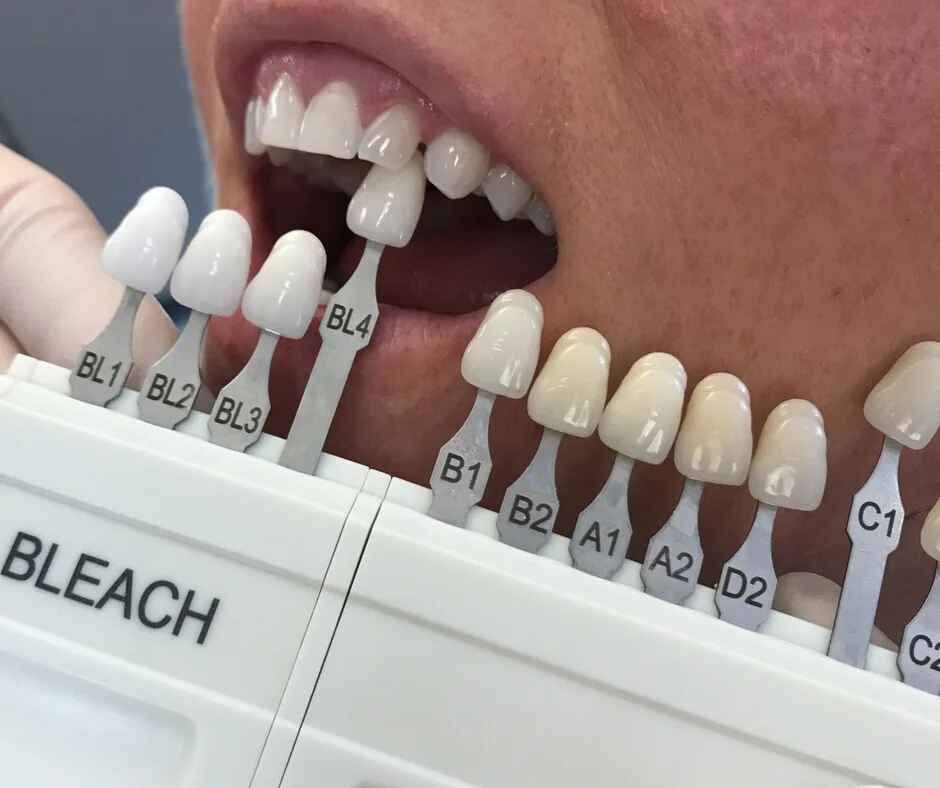
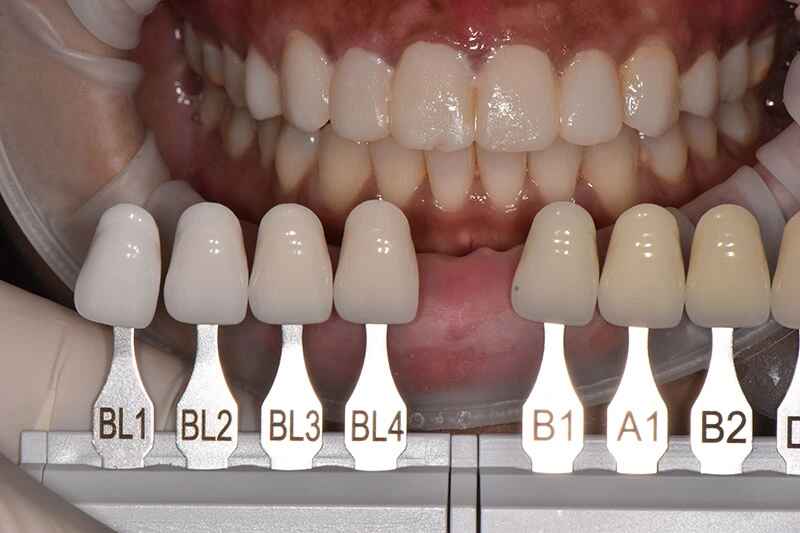
علامات التبويب الخاصة بالظلال قد تؤدي إلى التضليل.
عندما يحمل القشرة التجميلية التسمية الصحيحة A1 أو B1 أو BL3 أو OM2، لكنها تبدو مع ذلك مسطحة أو رمادية أو شاحبة أو منفصلة بشكل غريب عن الأسنان المجاورة، فإن السبب في ذلك عادةً ما يعود إلى اعتبار رمز اللون وصفة بصرية كاملة.
فلماذا نستمر في التصرف وكأن حرفين ورقمًا واحدًا يمكنهما وصف سن طبيعي؟
تُعد القيمة أكثر أهمية من علامة التبويب «الظل»، لأن القيمة هي التي تحدد مدى سطوع أو قتامة مظهر الترميم. تلاحظ العين علاقة السطوع هذه قبل أن تبدأ في تحليل الاختلافات الأصغر في درجات اللون الأصفر أو الأحمر أو الرمادي أو الشفافية أو تشبع المنطقة العنقية.
فالقشرة الخشبية التي تتمتع بالدرجة اللونية الصحيحة ولكن بدرجة سطوع مفرطة تبدو مصطنعة على الفور. أما الدرجة اللونية التي تنطوي على عيب طفيف مع درجة السطوع الصحيحة، فغالبًا ما تظل مقبولة بصريًّا عند مسافة المحادثة.
هذه هي الحقيقة المزعجة الكامنة وراء العديد من عمليات إعادة إنتاج الأفلام التي تبدو سطحية.
«علامة التظليل» هي تصنيف، وليست تشخيصًا بصريًّا
توفر علامة التظليل نقطة مرجعية لنا. لا أكثر من ذلك.
إنه لا ينقل المعنى بشكل كامل:
أهمية الثلث العنقي والوسطى والقطع من السن
ظل الجذع تحت القطعة الخزفية
سماكة المينا
الشفافية القاطعة
أوباليسنس
الفلورة
نسيج السطح
لمعان
سماكة السيراميك
تأثير الراتنج والأسمنت
تأثير الأسنان المحيطة واللثة
يقسم نظام مونسيل للألوان، الذي يحظى باستخدام واسع، الألوان إلى «الصبغة» و«التشبع» و«القيمة». تحدد «الصبغة» عائلة الألوان الأساسية، بينما تصف «التشبع» درجة تشبع اللون، وتصف «القيمة» درجة سطوعه أو قتامته النسبية.
عند اختيار لون القشرة، ينبغي عمومًا تقييم درجة اللون أولاً، ثم درجة التلوين، ثم درجة اللون. ويؤيد هذا الترتيب أيضًا الإرشادات السريرية الملخصة في الدراسة التي خضعت لمراجعة الأقران نظرة عامة على اختيار الألوان في طب الأسنان التجميلي.
هذا التسلسل مهم لأن أخطاء القيم تلفت الانتباه بشكل واضح.
قد تبدو السيراميك ذات القيمة العالية معتمة أو طباشيرية أو عريضة أو بيضاء بشكل مفرط. أما السيراميك ذات القيمة المنخفضة فقد تبدو رمادية أو باهتة أو غائرة أو باهتة اللون. وقد تنتمي الترميمات من الناحية الفنية إلى عائلة درجات الألوان A أو B الصحيحة، ومع ذلك تفشل في إضفاء المظهر الطبيعي بمجرد أن يبتسم المريض.
قبل تحديد أي علامة تبويب، يجب تحديد الهدف البصري جنبًا إلى جنب مع العناصر الأخرى الأهداف الجمالية المطلوبة قبل تصميم الفينير. فالظل ليس سوى جزء واحد من متطلبات التصميم تلك.
ما هي العوامل التي تؤثر فعليًّا على جماليات القشرة الخشبية؟
في نموذج الألوان CIE L*a*b*، يمثل L* درجة السطوع على مقياس يمتد من الأسود إلى الأبيض. ويصف الإحداثي a* المحور الأحمر-الأخضر، بينما يصف b* المحور الأصفر-الأزرق.
لا يحتاج الأطباء إلى حساب كل إحداثي أثناء العمل في عيادة الأسنان. لكنهم بحاجة إلى فهم التسلسل الهرمي.
تؤثر القيمة على عدة أحكام بصرية في آن واحد.
الحجم الظاهري للأسنان
تميل المناطق ذات القيم اللونية الأعلى إلى جذب الانتباه وتبدو أكثر بروزًا. فقد يبدو القاطع المركزي الذي تم تصنيعه بقيمة لونية مفرطة أعرض أو أكثر بروزًا حتى لو كانت أبعاده الفعلية صحيحة.
تبدو المناطق ذات القيم اللونية الأقل بعيدةً بصريًّا. وقد يؤدي ذلك إلى أن تبدو المنطقة التي خضعت للترميم أضيق أو أعمق أو أكثر رماديةً مقارنةً بالمنطقة المجاورة لها.
ولهذا السبب لا يمكن فصل زوايا الخطوط وانعكاس السطح عن عملية مطابقة ألوان الأسنان. فقد يؤدي تحريك زوايا الخطوط العاكسة نحو الداخل إلى جعل السن يبدو أضيق. كما أن تسطيح السطح الأمامي قد ينتج عنه انعكاس واحد واسع، مما يجعل نفس السن يبدو أكثر إشراقًا وأوسع.
العمق والحيوية
السن الأمامي الطبيعي ليس كتلة واحدة متجانسة اللون.
عادةً ما يتميز الثلث العنقي بدرجة لونية أعلى. وغالبًا ما يُعد الثلث الأوسط المرجع الرئيسي للقيمة اللونية. أما الثلث القاطع فيحتوي على تركيبات متنوعة من الشفافية، والهالة، والنتوءات السنية، والتلألؤ، والظلام المنعكس من الفم.
يمكن أن يتطابق القشرة مع علامة التبويب «الثلث الأوسط» مع فقدان هذا التوزيع تمامًا.
غالبًا ما توصف النتيجة بأنها “غامضة جدًّا” أو “بيضاء جدًّا” أو “غير طبيعية”. قد تبدو هذه الشكاوى غامضة، لكنها غالبًا ما تشير إلى خريطة قيم غير صحيحة، وليس إلى اختيار مجموعة ألوان خاطئة.
التكامل مع الأسنان المجاورة
تكشف حالات القشرة ذات الوحدة الواحدة عن أخطاء التقييم بلا رحمة.
في الحالات التي تتضمن ثماني أو عشر وحدات، يمكن للمختبر تهيئة بيئة بصرية جديدة على امتداد الابتسامة. وفي حالة وجود ترميم واحد أو اثنين، يجب أن يتعايش السيراميك مع الأسنان الطبيعية التي تتغير قيمتها وفقًا للزاوية، ومستوى الترطيب، والملمس، والإضاءة.
هذا أصعب.
لذلك، لا يكفي أن يحصل الفني على تقييم “A1” فحسب. بل عليه أن يعرف ما إذا كان يجب أن تندمج الترميمات مع الأسنان المجاورة أم أن تبرز لتضفي لمسة أكثر إشراقًا على الابتسامة.
الأرقام تكشف عن ضعف الاختيار العشوائي للظلال
قارنت دراسة أُجريت عام 2024 بين الاختيار البصري والتصوير الفوتوغرافي للأسنان والقياس الطيفي والماسح الضوئي داخل الفم. واستُخدمت ستة سيناريوهات مستهدفة للتاج، وتم تصنيع 24 حشوة.
أفاد الباحثون عن متوسط فروق الألوان التالية وفقًا لمعيار CIEDE2000:
طريقة اختيار الظل
المتوسط ΔE00
ما الذي تشير إليه النتيجة
الاختيار البصري باستخدام VITA 3D-Master
2.74
قريب من عتبة القبول البالغة 2.7 في الدراسة، ولكنه أعلى منها بقليل
التصوير الفوتوغرافي للأسنان
3.62
أكبر تباين متوسط في هذا البروتوكول
مقياس الطيف الضوئي
2.13
أدنى متوسط لعدم التطابق
ماسح ضوئي داخل الفم
3.50
فوق عتبة المقبولية المحددة
لم تصل الفروق بين المجموعات إلى درجة الدلالة الإحصائية عند المستوى المحدد في الدراسة، لكن الأرقام الأولية تستحق الاهتمام مع ذلك. فقد سجل جهاز القياس الطيفي أقل متوسط لقيمة ΔE00، في حين سجلت الصور الفوتوغرافية غير المعالجة أعلى متوسط.
لم يكن البروتوكول البصري عشوائياً. فقد استخدم إضاءة D65 بدرجة حرارة تبلغ حوالي 6500 كلفن، وخلفية سوداء، ومسافة مشاهدة تتراوح بين 25 و30 سم، وجهاز VITA 3D-Master، وفترة راحة بصرية مدتها 20 دقيقة قبل الاختيار. وتم اختيار القيمة أولاً، ثم التلوين، وأخيراً الدرجة اللونية.
هذا المستوى من التحكم يختلف تمامًا عن وضع شريحة A1 بجانب سن مجفف تحت ضوء غرفة العلاج.
وخلص الباحثون إلى أنه يمكن التوصية باستخدام القياس الطيفي الضوئي في الإجراءات الروتينية، وأن التصوير الفوتوغرافي يتطلب مزيدًا من التوحيد القياسي، بما في ذلك التحكم باستخدام البطاقة الرمادية والاستقطاب المتقاطع.
إليكم تفسيري الصريح: شراء كاميرا لا يعني بالضرورة وضع بروتوكول للظلال.
قد تمنح الصورة التي لم يتم توحيد معاييرها بشكل جيد شعوراً زائفاً بالثقة بفضل دقتها العالية.
لماذا لا تزال A1 تنتج قشرة خشبية غير صحيحة
تصف علامة التبويب «الظل» الهدف بشكل غير دقيق. ثم تُدخل عملية الترميم عدة متغيرات إضافية.
متغير
ما يجب التحكم فيه
ماذا يحدث إذا تم تجاهل ذلك؟
القيمة
الخفة الإجمالية وتوزيعها من المنطقة العنقية إلى المنطقة القاطعة
يبدو القشرة طباشيري اللون، أو رمادي، أو مسطح، أو منفصل
Chroma
التشبع، لا سيما في منطقتي العنق والجذع
تبدو الصورة باهتة أو مفرطة في اللون الأصفر
هوي
مجموعة الألوان الأساسية والتوازن بين اللونين الأحمر والأصفر
يظهر التباين الطفيف بين أفراد الأسرة بوضوح عند النظر عن قرب
الشفافية
كمية الضوء المنقول ونمطه
يبدو القشرة غير شفاف، أو داكن، أو مجوف، أو زجاجي
ظل الجذع
اللون الموجود تحت الطبقة المرممة
تؤدي الركائز الداكنة إلى انخفاض القيمة النهائية أو إلى ظهور وحدات غير متساوية
سماكة السيراميك
مساحة متاحة لعمليات الإخفاء والتراكب البصري
تكشف المناطق الرقيقة عن الطبقة السفلية؛ أما المناطق السميكة فقد تبدو معتمة
الأسمنت الراتنجي
تأثير خفيف، أو محايد، أو دافئ، أو معتم
التغير النهائي في إحداثيات L* و a* و b* بعد التثبيت
الملمس واللمعان
اتجاه وقوة الضوء المنعكس
لون السيراميك الصحيح لا يزال يبدو اصطناعيًا
الترطيب
المينا الرطبة مقابل المينا المجففة
يتم اختيار درجة لون فاتحة جدًّا بعد فترة عزل طويلة
الإضاءة
درجة حرارة اللون وجودة الطيف
يؤدي التناظر اللوني إلى ظهور تباينات مختلفة في الغرف المختلفة
لا يمكن لـ«tab» حل هذا النظام بمفرده.
الطبقة التحتية جزء من اللون النهائي
القشور الرقيقة تسمح بمرور الضوء.
يمر هذا الضوء عبر السيراميك، ويتفاعل مع الأسمنت الراتنجي والسن المُعدّ، ثم يعود عبر الترميم. ولذلك، فإن التحضير الداكن، أو اللب المركب الكبير، أو السن الذي خضع لعلاج جذور الأسنان، أو الحالات التي تتخللها درجات لونية متنوعة في جذع السن، يمكن أن تغير القيمة النهائية بشكل جوهري.
ويكون هذا الأمر مهمًا بشكل خاص عندما يتراوح سمك السيراميك بين 0.3 و0.5 ملم تقريبًا.
أجرى أحد الأبحاث في عام 2023 اختبارًا على 40 عينة مصنوعة من ثنائي سيليكات الليثيوم وأربع مواد من الزركونيا فائقة الشفافية. وبلغ سمك الأقراص 0.5 ملم، وتم اختبارها باستخدام معاجين تجريبية من نوع «Variolink Esthetic» ذات ألوان محايدة وفاتحة ودافئة.
أظهرت جميع مجموعات المواد تغيرات ملحوظة في اللون بعد خطوة التصلب المحاكاة. وتراوحت قيم ΔE المبلغ عنها بين 3.82 و6.83، متجاوزةً عتبة الإدراك السريري للدراسة البالغة 3.3. كما انخفضت درجة السطوع، المتمثلة في L*، انخفاضًا ملحوظًا بعد تطبيق المعاجين.
لكن الأسمنت ليس حلاً إنقاذياً لترميم خزفي تم تصنيعه بقيم غير صحيحة. يمكن أن يساعد معجون التجربة في تحسين النتيجة البصرية؛ لكنه لا يمكنه إصلاح التعتيم أو السماكة غير الصحيحة، أو اختيار المادة غير المناسب، بشكل موثوق.
طريقة عمل أفضل لاختيار لون القشرة الخشبية
تعد الطريقة التالية أكثر مبرراً من اختيار فحص معين والتمني بأن يقوم المختبر بتفسير بقية النتائج.
يجب إتمام عملية الاختيار الأولي قبل الشد المطول للأسنان أو تحضيرها أو عزلها باستخدام الحاجز المطاطي. فالمينا تصبح أفتح لونًا وأقل تدرجًا لونيًّا مع جفافها.
لا تبني حجتك بالكامل على مظهر السن الجاف.
2. التحكم في بيئة المشاهدة
استخدم بيئة محايدة ومصدر إضاءة يمكن تكراره.
تجنب ارتداء الملابس ذات الألوان الزاهية، والمرايل الملونة، وأحمر الشفاه ذي الألوان القوية، والقفازات الزرقاء بالقرب من حقل العمل، والإضاءة المباشرة في غرفة العلاج. يمكن لمصدر الإضاءة الذي تم تصحيح ألوانه وفقًا لمعايير D65 أن يحسّن قابلية التكرار، على الرغم من أن نوع المعدات المستخدمة ليس بنفس أهمية وجود بروتوكول منظم تفهمه كل من العيادة والمختبر.
احرص على أن يكون اللسان والسن في نفس المستوى الرأسي. فاللسان الذي يوضع على بعد عدة سنتيمترات أمام السطح الأمامي للسن يستقبل الضوء ويعكسه بطريقة مختلفة.
3. حدد «القيمة أولاً»
يمكن أن يقلل التحديق أو النظر لفترة وجيزة إلى السن واللسانات من خلال مرجع بتدرج الرمادي من التشتيت الناجم عن درجة اللون ودرجة التشبع.
ابدأ بتحديد مجموعة القيم الصحيحة. ثم قم بتحسين درجة اللون. وأخيرًا، قم بتقييم درجة اللون.
وهذا أحد الأسباب التي تجعل برنامج VITA 3D-Master مفيدًا للأطباء الساعين إلى الحصول على أفضل دليل ألوان للفينير: حيث يبدأ تصنيفه بمجموعات درجات السطوع بدلاً من الاعتماد فقط على مجموعات الألوان التقليدية من A إلى D.
لا يزال برنامج «VITA Classical» مفيدًا ومألوفًا، لكن لا ينبغي الخلط بين هذه المألوفية والتواصل الكامل بشأن الألوان.
4. قم بتسجيل خريطة الظلال، وليس رمزًا واحدًا
قسّم السن إلى ثلاثة أجزاء: الجزء العنقي، والجزء الأوسط، والجزء القاطع.
السجل:
القيمة السائدة في الثلث الأوسط
لون عنق الرحم
الشفافية القاطعة
شدة الهالة
وضوح الحلمة
تأثيرات بيضاء أو كهرمانية
مناطق نقص التكلس
خطوط كريز
نسيج السطح
مستوى اللمعان
بالنسبة للقاطع المركزي، سأقوم أيضًا بتسجيل الفروق في القيم الميسية والديستالية. فنادرًا ما تظهر الأسنان الطبيعية انعكاسًا متطابقًا عبر كامل السطح الأمامي.
5. التقاط صور صحيحة للعلامات المحددة
يجب أن تُظهر الصورة الظلية المفيدة رمز التبويب بوضوح، وأن يوضع التبويب بجانب السن على نفس العمق.
أدرج عدة مراجع بدلاً من الاكتفاء بالمطابقة المثالية المفترضة. ويمكن أن تساعد علامتا التبويب «القيمة الأقل» و«القيمة الأعلى» الفني على فهم النطاق المقبول.
الاستخدام:
التعريض اليدوي
توازن اللون الأبيض الثابت
التقاط بتنسيق RAW عند توفره
عدسة ماكرو
موضع الفلاش القابل للتكرار
البطاقة الرمادية أو مرجع المعايرة
مرشحات الاستقطاب المتقاطع للألوان الداخلية
خلفية سوداء لإبراز شفافية الحافة القاطعة عند الاقتضاء
ثم أرسل الملفات الأصلية. فقد يؤدي ضغط الملفات في تطبيقات المراسلة إلى إتلاف بيانات الألوان المفيدة.
6. تسجيل كل لون من ألوان الظلال بشكل منفصل
الظل النهائي والظل المتبقي هما سجلان مختلفان.
قد تحتوي مجموعة مكونة من عشر وحدات على عشرة تركيبات مختلفة. فقد يحتفظ أحد الأسنان بمينا لامعة، بينما قد يكون العاج مكشوفًا في سن آخر، وقد يحتوي سن ثالث على لب مركب داكن اللون.
إن تقديم رمز ظل جذع واحد للحالة بأكملها يعني مطالبة المختبر بتخمين الوحدات التي تحتاج إلى درجة أعلى من التعتيم.
يجب أن يراعي اختيار المواد نوع الركيزة، والسماكة المتاحة، ومتطلبات التغطية، وظروف الالتصاق، والخصائص البصرية المقصودة.
أن قشرة E.max veneer قد يوفر توازنًا مفيدًا بين متانة ثاني أكسيد الليثيوم والشفافية في العديد من حالات الأسنان الأمامية الملصقة.
A قشرة E.max ذات الطبقات يتيح مزيدًا من التحكم في الشكل الداخلي، وتوزيع القيم، والملمس، وتأثيرات الحافة القاطعة، وذلك في الحالات التي تتطلب نتيجة أكثر تخصيصًا.
A القشرة الفلسباتية يمكن أن يدعم هذا النهج تكوين طبقات بصرية عالية التفصيل في الحالات المناسبة التي تتوفر فيها شروط مواتية من حيث المينا والمسافة ولون الركيزة والوظيفة.
ليس هناك نوع من السيراميك يُعتبر تلقائيًّا “الأكثر جمالية”.”
السيراميك المناسب هو الذي يمكنه تحقيق القيمة المحددة والسلوك البصري المطلوب في إطار القيود السريرية الفعلية.
8. التحقق من القيمة قبل التثبيت النهائي
يجب تقييم معاجين الاختبار مع بقاء المريض في وضع مستقيم وتثبيت الترميمات بشكل كامل.
تحقق من النتيجة تحت أكثر من مصدر إضاءة واحد. قم بالتقييم من مسافة قريبة ومن مسافة المحادثة. التقط صورة للوجه بالكامل بدلاً من الاكتفاء بالحكم من خلال منظر من مسافة بعيدة.
وقم أولاً بمقارنة القاطعتين المركزيتين.
تشكل النقاط المركزية المرجع البصري للتركيب الأمامي. وقد تكون الاختلافات الطفيفة في القيم بينها أكثر تشتيتًا للانتباه من الاختلافات الكبيرة في درجة اللون التي تقع بعيدًا عن خط الوسط.
أربع حقائق صعبة حول مطابقة ألوان الفينير الخزفي
«كود التظليل» ليس وصفة طبية
“يتيح خيار ”A1، طبيعي» للفني اختيار درجة التعتيم، وتشبع منطقة العنق، والهالة، والملمس، والشفافية، واللمعان.
هذا ليس تواصلًا. إنه تفويض دون توثيق.
الأجهزة الرقمية لا تلغي القدرة على التمييز
يمكن أن يسهم مقياس الطيف الضوئي في تحسين قابلية التكرار، لكنه يقيس منطقة معينة في ظل ظروفه البصرية الخاصة. كما أنه لا يحدد تلقائيًا شكل السن، أو مورفولوجيا السطح، أو طبقات السيراميك، أو إخفاء جذع السن، أو تفضيلات المريض.
يجمع أفضل مسار عمل بين استخدام الأجهزة والتصوير الفوتوغرافي المعياري والتقييم البصري.
جودة التصوير الفوتوغرافي تعتمد كليًّا على مدى توحيد معاييره
قد تؤدي الكاميرا باهظة الثمن التي تُستخدم في وضع التعريض التلقائي إلى الحصول على صور ذات تدرجات لونية غير متسقة.
يؤدي تغيير مسافة الفلاش، أو فتحة العدسة، أو توازن اللون الأبيض، أو الشاشة، أو موضع مرشح الاستقطاب، أو إعدادات معالجة الصورة إلى تغيير المعلومات التي يتلقاها المختبر.
«الحدة» لا تعني «الدقة».
العديد من “إعادة إنتاج Shade” هي في الواقع إعادة إنتاج للتصميم
قد يتم رفض قشرة الأسنان باعتبارها شديدة اللمعان، في حين أن المشكلة الحقيقية تكمن في بروز ملامح الوجه بشكل مفرط ووجود انعكاس واسع النطاق.
يمكن وصف الحالة بأنها «رمادية أكثر من اللازم» عندما تكون المشكلة تتمثل في شفافية مفرطة في حافة السن القاطعة على خلفية فموية داكنة.
قد يبدو لونه غير شفاف لأن الفني استخدم طبقة إضافية من التغطية للتعويض عن لون جذع غير موثق.
إن وصف كل هذه المشكلات بـ“اللون الخاطئ” يمنع الفريق من تحديد سبب الفشل الفعلي.
الأسئلة الشائعة
لماذا تعتبر القيمة أكثر أهمية من درجة اللون في جماليات القشرة الخشبية؟
الدرجة اللونية هي درجة الإضاءة أو الظلام النسبية للسن أو الحشوة، وعادةً ما تلعب دوراً رئيسياً في جماليات الفينير؛ لأن عدم تطابق الدرجة اللونية يغير السطوع الظاهري والعمق والعرض والتكامل البصري للسن بأكمله، قبل أن يلاحظ المراقب الاختلافات الأصغر في درجة اللون أو كثافة اللون.
قد تبدو الطبقة الخارجية ذات القيمة العالية شاحبة وكبيرة الحجم. أما الطبقة الخارجية ذات القيمة المنخفضة فقد تبدو رمادية أو باهتة. ولهذا السبب، ينبغي عمومًا اختيار القيمة أولاً، ثم الكروما ثانيًا، وأخيرًا الدرجة اللونية.
ما هي المعلومات التي لا تنقلها علامة التظليل؟
تُعد لوحة الألوان مرجعًا بصريًّا موحدًا لتسمية اللون العام للأسنان، لكنها لا تستطيع أن تصف بشكل كامل التدرج اللوني للقشرة، أو شفافيتها، أو تأثير لون جذع السن، أو تأثير مادة التثبيت الراتنجية، أو نسيج السطح، أو الفلورة، أو التلألؤ، أو الطريقة التي تعكس بها الأجزاء الثلاثة المختلفة للسن الضوء وتنقله.
لذلك، يجب أن تتضمن الوصفة الطبية صورًا من «شيد-تاب»، وخريطة ألوان مكتوبة، وألوان الجذع، وسماكة السيراميك، واختيار المواد، وتعليمات الملمس، والهدف البصري الذي وافق عليه المريض.
كيف ينبغي لطبيب الأسنان أن يختار لون الفينير الخزفي؟
يُعد اختيار لون القشرة بشكل دقيق عملية سريرية منظمة تسجل «القيمة» أولاً، ثم «الصبغة» ثانيًا، ثم «الدرجة اللونية» ثالثًا، ثم تُضاف إليها الصور المعيارية، ولون الجذع، وسماكة السيراميك، وشفافية المادة، وملمس السطح، وظروف الإضاءة، ومعلومات تجربة التركيب باستخدام مادة الراتنج والاسمنت، بحيث يتلقى المختبر وصفة بصرية بدلاً من مجرد رمز واحد.
يجب اختيار لون التجهيز قبل حدوث جفاف كبير. ويجب تصوير الألواح المختارة في نفس المستوى مع السن، كما يجب تسجيل لون الجذع بشكل فردي لكل تجهيز.
ما هو أفضل دليل ألوان للفينير؟
أفضل دليل ألوان للفينير هو النظام الذي يتيح للطبيب تنظيم درجات اللون بشكل يمكن التنبؤ به، والتعبير عن النظام المسمى بوضوح، والتحقق من النتيجة باستخدام التصوير الفوتوغرافي المعاير أو أداة قياس؛ وفي العديد من إجراءات العمل، يُعد نظام VITA 3D-Master مفيدًا لأن مجموعاته منظمة وفقًا لدرجة السطوع قبل درجة اللون والصبغة.
لا يزال نظام «VITA Classical» يحظى باعتراف واسع النطاق، لكن لا يمكن لأي من النظامين أن يحل محل رسم خرائط الظلال، والتصوير الفوتوغرافي المعياري، وتوثيق ظلال جذوع الأشجار، والتحقق المختبري.
هل يمكن للأسمنت الراتنجي تصحيح قيمة القشرة الخزفية؟
الأسمنت الراتنجي هو طبقة بصرية رقيقة يمكنها تغيير اللون النهائي للقشرة الشفافة، لكنه لا يمكنه إنقاذ الترميم بشكل موثوق إذا كانت قيمة السيراميك أو عتامة القشرة أو سماكتها أو خطة التعامل مع الركيزة خاطئة بشكل جوهري، خاصةً عندما تتراوح سماكة القشرة بين 0.3 و0.5 ملم تقريبًا.
استخدم معاجين التجربة لمقارنة خيارات المواد اللاصقة قبل عملية التثبيت. لا تعامل المادة اللاصقة كحل تصحيحي في اللحظة الأخيرة لترميم تم تصنيعه بشكل غير صحيح.
أرسل خريطة القيم، لا رمز التظليل
قبل إرسال حالة القشرة التالية، توقف عن كتابة “A1” أو “BL3” فقط.”
سجل قيمة الثلث الأوسط. حدد خريطة لون العنق. التقط صورة للون النهائي ولكل لون من ألوان الجذع. حدد درجة الشفافية والهالة والملمس واللمعان المطلوبة. تأكد من سماكة السيراميك ومن مادة التثبيت الراتنجية المقترحة. أطلع المختبر على ما وافق عليه المريض.
ثم اطرح سؤالاً بسيطاً واحداً:
هل يجب أن تتطابق هذه الترميمات مع إحدى العلامات، أم أنها يجب أن تكون على وجه المريض؟
للمراجعة الفنية للمواد، أو تقييم سجل درجات الألوان، أو التخطيط لحالة تجريبية في المنطقة الأمامية، يرجى إرسال الصور الممسوحة ضوئيًا، والصور الفوتوغرافية، ودرجات ألوان الجذع، والوصفة الطبية عبر صفحة الاستشارة الخاصة بمختبر «أرتيست» لطب الأسنان.