価格・サンプルに関するお問い合わせ
ジルコニアクラウン、二ケイ酸リチウムクラウン、ベニア、OEMサービス、あるいは修復物の卸売り注文を比較検討している歯科技工所、歯科医院、販売代理店、および調達担当者の方へ。.
取り扱い製品の種類、素材、月間販売数量、輸出先国、およびサンプルのご要望をお知らせください。営業チームが適切な対応策を講じることができます。.

シェードタブは誤解を招く。.
ベニアに正しいA1、B1、BL3、またはOM2の指定がされているにもかかわらず、見た目が平坦だったり、灰色がかっていたり、白っぽかったり、あるいは隣接する歯から妙に浮いて見えたりする場合は、その失敗の原因は通常、シェードコードを完全な光学的な処方として扱ってしまったことにあります。.
では、なぜ私たちは、たった2文字と1つの数字で天然の歯を表現できるかのように振る舞い続けているのでしょうか?
色相タブよりも明度が重要です。なぜなら、修復物の見た目の明るさや暗さを左右するのは明度だからです。目は、黄色、赤、灰色、半透明度、あるいは頚部の彩度といった細かい違いを分析し始める前に、まずその明るさの関係に気づくのです。.
色相は適切でも明度が過度にあるベニアは、一目で不自然に見えてしまいます。一方、色相に多少の不備があっても、明度が適切であれば、会話をする距離から見た場合、多くの場合、視覚的に許容できる範囲にとどまります。.
それが、多くのベニア材を使ったリメイク作品の背後にある、気まずい真実なのです。.
シェードタブは、単なる目安に過ぎません。それ以上の意味はありません。.
その内容は十分に伝わっていません:
広く用いられているマンセル色相体系では、色を「色相」、「彩度」、「明度」に分類しています。色相は基本的な色の系統を示し、彩度はその色の濃さを表し、明度はその色の明るさや暗さの相対的な程度を表します。.
ベニアの色調選定にあたっては、一般的にまず明度を評価し、次に彩度、そして色相の順に評価すべきである。この順序は、査読付き論文にまとめられた臨床ガイダンスによっても支持されている。 審美歯科におけるシェード選定の総説.
このシーケンスが重要なのは、値のエラーが目立って目立つからです。.
高彩度のセラミックは、不透明に見えたり、白亜質に見えたり、幅広に見えたり、あるいは白すぎたりすることがあります。低彩度のセラミックは、灰色っぽく見えたり、くすんで見えたり、くぼんで見えたり、あるいは活気がないように見えたりすることがあります。修復物は技術的には正しいAまたはBのシェードファミリーに属していても、患者さんが笑顔を見せた瞬間に失敗作となってしまうことがあります。.
いずれかのタブを選択する前に、他の項目とともに光学ターゲットを定義しておく必要があります。 ベニアの設計に先立って必要な審美的な目標. シェードは、そのデザイン要件の一部に過ぎません。.
CIE L*a*b* 色空間において、L* は黒から白へと続く尺度上の明度を表します。a* 座標は赤・緑軸を表し、b* は黄・青軸を表します。.
臨床医は、チェアサイドで座標をいちいち計算する必要はありません。しかし、その階層構造を理解しておく必要があります。.
価値は、複数の視覚的判断に同時に影響を及ぼします。.
明度の高い部分は注目を集めやすく、より目立つ傾向があります。中央切歯を明度が高すぎる状態で製作すると、実際の寸法が正しくても、幅が広く見えたり、目立ちすぎたりすることがあります。.
明度が低い部分は視覚的に奥行きを感じさせます。これにより、修復部分は隣接する部分に比べて、幅が狭く見えたり、奥行きが深く見えたり、あるいは灰色っぽく見えたりすることがあります。.
だからこそ、ラインアングルや表面の反射は、歯の色調合わせから切り離して考えることはできません。反射するラインアングルを内側に移動させると、歯が細く見えることがあります。顔面側の表面を平らにすると、1つの広い反射が生じ、同じ歯でもより明るく、広く見えるようになります。.
天然の前歯は、色が均一な一枚岩のようなものではありません。.
通常、歯頸部の3分の1は彩度が高くなります。中部の3分の1は、多くの場合、主な明度基準となります。切縁部の3分の1には、半透明感、ハロー、マメロン、オパール光沢、および口腔内の暗さが反射して現れる現象などが、さまざまな組み合わせで含まれています。.
ベニアは、中央3分の1のタブと一致させつつ、その分布を完全に失うことも可能です。.
その結果、よく「不透明すぎる」「白すぎる」「不自然だ」といった評価が寄せられます。こうした不満は曖昧に聞こえるかもしれませんが、多くの場合、色調の系統そのものが間違っているというよりは、値マップの設定が不適切であることを指摘しているのです。.
単歯ベニアの症例では、審美性の誤りが容赦なく露呈してしまう。.
8~10本の症例では、歯科技工所はスマイルライン全体にわたって新たな光学的環境を創出することができます。1~2本の修復物の場合、セラミックは、角度、水分含有量、質感、照明によってその見え方が変化する天然歯と調和しなければなりません。.
それはもっと難しいですね。.
したがって、歯科技工士には「A1」以上の知識が求められます。修復物が隣接する歯列に溶け込むべきか、それとも意図的に明るい笑顔の明度を演出すべきかを見極める必要があるのです。.
2024年の研究では、目視による選定、歯科用写真、分光測色法、および口腔内スキャナーを比較した。6つの対象となるクラウンのシナリオを用い、24個の修復物が製作された。.
研究者らは、CIEDE2000による以下の平均色差を報告した:
| シェードの選定方法 | ΔE00の平均値 | この結果が示唆すること |
|---|---|---|
| VITA 3D-Master による視覚的な選択 | 2.74 | この研究で設定された2.7という受容性の閾値に近く、ただしそれをわずかに上回っている |
| 歯科用写真撮影 | 3.62 | このプロトコルにおける最大の平均ミスマッチ |
| 分光光度計 | 2.13 | 平均ミスマッチが最小 |
| 口腔内スキャナー | 3.50 | 記載された許容閾値を上回る |
グループ間の差は、本研究で設定した有意水準では統計的に有意とはならなかったが、その生データには依然として注目に値する。分光光度計による測定結果が最も低い平均ΔE00を示したのに対し、未処理の写真による測定結果が最も高かった。.
視覚評価プロトコルは、決して適当なものではありませんでした。約6500 KのD65照明、黒い背景、25~30 cmの視距離、VITA 3D-Masterを使用し、選定前には20分間の視覚休息を設けました。評価は、まず明度、次に彩度、最後に色相の順に行われました。.
そのレベルの制御は、診療用ライトの下で、脱水処理された歯の横にA1タブを置いて確認する作業とはかけ離れています。.
研究者らは、分光光度法は日常的な使用に推奨できる一方、写真撮影については、グレーカードによる管理や交差偏光など、さらなる標準化が必要であると結論付けた。.
率直に言えば、カメラを購入したからといって、シェードプロトコルが作成されるわけではない。.
標準化が不十分な写真は、解像度が非常に高いにもかかわらず、誤った安心感を与えてしまう可能性がある。.
「シェード」タブでは、対象を不完全な形で説明しています。さらに、修復作業によって、いくつかの追加の変数が生じます。.
| 変数 | 管理すべき事項 | それを無視するとどうなるのか |
|---|---|---|
| 値 | 全体的な軽度さと、その歯頸部から切縁にかけての分布 | ベニアの表面が白っぽく、灰色で、平坦、あるいは剥がれているように見える |
| Chroma | 飽和度、特に頸部および体幹部において | 復元画像が色あせて見えたり、黄色みが強すぎたりする |
| フエ | 基本的な色群と赤・黄のバランス | 間近で見ると、家族間の微妙な不一致が明らかになる |
| 透明度 | 透過光の量と分布 | ベニアは、不透明、暗色、中空、あるいはガラスのような外観を呈する |
| スタンプシェード | 修復の下にある色 | 暗い基板は、最終的な値を下げたり、不均一な測定値をもたらしたりします |
| セラミックの厚さ | マスキングおよび光学積層用の空きスペース | 薄い部分は下地が見え、厚い部分は不透明に見える場合があります |
| レジンセメント | 明るい、ニュートラル、温かみのある、あるいは不透明な印象 | 着座後のL*、a*、b*の座標の最終的な変化 |
| 質感と光沢 | 反射光の方向と強度 | 正しいセラミックの色でも、やはり人工的な印象が拭えない |
| 水分補給 | 湿潤なエナメル質と脱水したエナメル質 | 長期にわたる隔離の後、シェードが明るすぎに設定されてしまう |
| 照明 | 色温度と分光品質 | メタメリズムにより、部屋によって異なる組み合わせが生じる |
タブだけでは、この連立方程式を解くことはできません。.
薄いベニアは光を通します。.
その光はセラミックを透過し、レジンセメントや形成された歯と相互作用した後、修復物を通って戻ってきます。したがって、暗い色の形成部、大きなコンポジットコア、根管治療済みの歯、あるいは歯髄色と歯冠色が混在する症例では、最終的な色調が大幅に変化する可能性があります。.
これは、セラミックの厚さがおよそ0.3~0.5 mmの場合に特に当てはまります。.
2023年に行われたある調査では、二ケイ酸リチウム製の試料40個と、超高透過性ジルコニア材料4種類について試験が行われた。ディスクの厚さは0.5 mmで、中性、ライト、ウォームの各色のVariolink Estheticトライインペーストを用いて試験が行われた。.
すべての材料群において、模擬セメント固定工程後に有意な色調の変化が認められた。報告されたΔE値は3.82から6.83の範囲であり、本研究で設定した臨床的知覚閾値である3.3を上回った。また、L*で表される明度も、ペースト塗布後に有意に低下した。.
全文を読む セメントの色調、ジルコニア、および二ケイ酸リチウム製ベニアに関する研究 材料ごとのデータについては。.
セメントは重要です。.
しかし、セメントは、不適切な条件で製作されたセラミック修復物を救うための手段ではありません。トライインペーストは、審美的な仕上がりを調整するのに役立ちますが、不適切な不透明度、厚み、あるいは材料の選択を確実に修正することはできません。.
タブを選択して、残りの部分を検査機関が解釈してくれることを期待するよりも、以下の手順の方がより妥当である。.
歯垢、口紅、血液、仮接着剤、乾燥による跡、および表面の汚れは、知覚に影響を与えます。.
長時間のリトラクション、形成、またはラバーダムによる隔離を行う前に、初期の選択を完了させておいてください。エナメル質は脱水が進むにつれて色が薄くなり、彩度も低下します。.
乾燥した歯の外観だけを根拠に、診断を下してはいけません。.
中立的な環境と、再現性のある光源を使用してください。.
鮮やかな色の衣服、色付きのよだれかけ、濃い色の口紅、診療室付近での青い手袋、および診療用照明の直射光は避けてください。D65条件に近い色補正された光源を使用することで再現性を向上させることができますが、具体的な機器の種類よりも、診療所と歯科技工所の双方が理解している管理された手順を確立することの方が重要です。.
タブと歯を同じ垂直面上に保ってください。歯より数センチメートル外側に位置するタブは、光の受け方や反射の仕方が異なります。.
目を細めたり、グレースケールの基準画像を通して歯やタブをちらっと見たりすることで、色相や彩度による注意の散漫を抑えることができます。.
まず、適切な値のグループを特定することから始めます。次に、彩度を調整します。色相の評価は最後にします。.
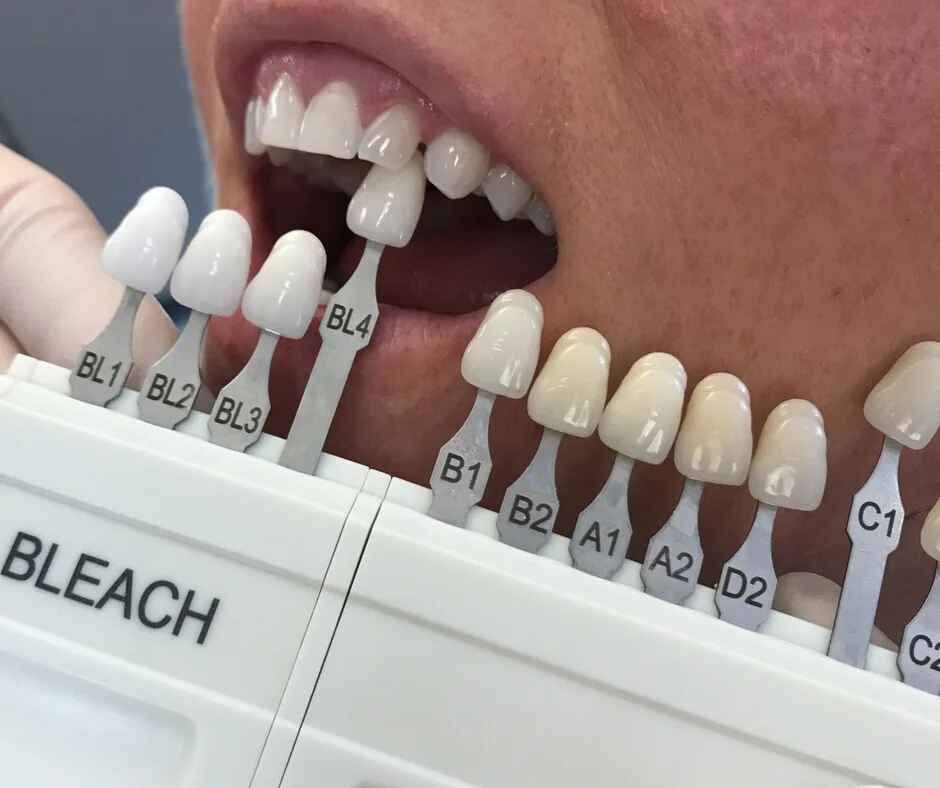
これが、ベニアに最適なシェードガイドを求める臨床医にとって、VITA 3D-Masterが有用である理由の一つです。このガイドは、従来のA~Dのカラーファミリーのみに依存するのではなく、明度グループを基に構成されているからです。.
VITA Classicalは依然として有用で馴染み深いものですが、その馴染み深さを、色に関する完全な意思疎通と混同してはなりません。.
歯を歯頸部、中部、切縁部の3つの部分に分けます。.
記録:
中切歯については、近心側および遠心側の値の差も記録しておく。天然歯において、顔面面全体にわたって反射が完全に同一であることはめったにない。.
有用なシェード写真では、タブのコードがはっきりと確認でき、タブが歯と同じ深さに位置している必要があります。.
「完璧に一致すると考えられるもの」だけでなく、いくつかの参照例を挙げておくこと。「下限値」と「上限値」のタブを設けることで、技術者が許容範囲を把握しやすくなります。.
使用方法:
その場合は、元のファイルを送ってください。メッセージングアプリの圧縮機能によって、重要な色データが失われる可能性があります。.
最終的な木陰と切り株の陰は、それぞれ別の記録です。.
10本分の症例には、10種類の異なる処置が含まれている場合があります。ある歯は明るいエナメル質を残している一方で、別の歯は象牙質が露出しており、また別の歯には暗い色のコンポジットコアが充填されているといった具合です。.
症例全体に対して1つのスタンプシェードコードを提出すると、検査室側には、どのユニットにより高い不透明度が必要かを推測するよう求めてしまうことになります。.
について 前歯部ベニア症例の提出チェックリスト 日陰での撮影と、準備画像、スキャンデータ、承認済みの仮歯、顔面記録、および機能に関する情報をどのように組み合わせるかについて解説しています。.
材料の選定にあたっては、基板、利用可能な厚さ、マスキング要件、接合条件、および意図する光学特性を考慮すべきである。.
アン E.maxベニヤ 多くの接着治療を要する前歯部症例において、二ケイ酸リチウムの強度と半透明性のバランスを適切に保つことができる可能性がある。.
A レイヤーE.maxベニヤ より個性的な仕上がりが求められる場合、歯の内部構造、値の分布、質感、および切縁の効果について、さらにきめ細かな調整が可能になります。.
A 長石化粧板 エナメル質の状態、スペース、下地の色、および機能的な条件が適切である場合には、非常に精細な光学的な層形成が可能となります。.
どのセラミックも、自動的に「最も審美性に優れている」というわけではない。“
適切なセラミックとは、実際の臨床上の制約条件の中で、所定の数値と光学特性を発揮できるものである。.
試着用ペーストの評価は、患者を直立させた状態で、修復物を完全に装着した状態で行う必要があります。.
複数の光源の下で結果を確認してください。至近距離と会話距離の両方で評価を行ってください。顔を後ろに引いた状態だけで判断するのではなく、正面からの写真を撮影してください。.
まずは、2本の中央の切歯を比べてみましょう。.
中央部の要素は、画面前方の構図における視覚的な基準となります。中央部の要素間のわずかな明度差は、中央線から離れた場所にある大きな色相の差よりも、かえって視線をそらす原因になり得ます。.
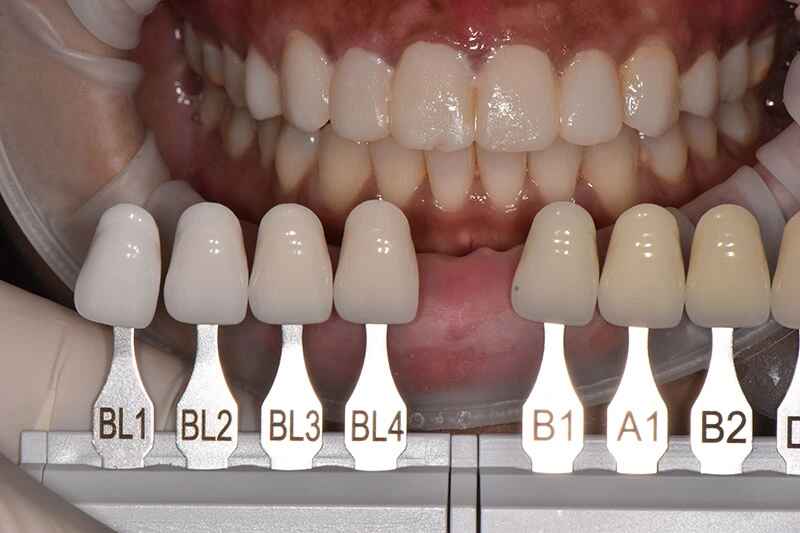
“「A1、ナチュラル」を選択すると、不透明度、歯頸部の彩度、ハロー、質感、半透明度、光沢は技工士が選択することになります。.
それはコミュニケーションではありません。記録のない業務の委任に過ぎません。.
分光光度計は再現性を向上させることができますが、その測定は装置独自の光学条件下での特定領域に限られます。歯の形状、表面形態、セラミックの積層状態、歯台部のマスキング、あるいは患者の好みについては、自動的に判定することはできません。.
最適なワークフローとは、計測と標準化された写真撮影、および目視評価を組み合わせたものです。.
高価なカメラを自動露出設定で使用すると、露出のばらつきが生じることがあります。.
フラッシュ距離、絞り、ホワイトバランス、モニター、偏光フィルターの位置、または画像処理の設定を変更すると、現像所が受け取る情報が変わります。.
「シャープ」は「正確」を意味するわけではありません。.
ベニアが「明るすぎる」という理由で却下されることがありますが、実際の問題は顔の輪郭が際立ちすぎていることや、反射範囲が広すぎる点にある場合があります。.
口腔内の背景色が濃い場合に、切歯の透過性が制御不能なほど強すぎる場合、その状態は「灰色がかっている」と表現されることがある。.
技術者が、仕様書に記載されていない切り株の色合いを補正するために追加のマスキングを施したため、不透明に見える可能性があります。.
これらすべての問題を「色合いが間違っている」とひとくくりにしてしまうと、チームは実際の不具合を特定できなくなってしまいます。.
「明度」とは、歯や修復物の相対的な明るさや暗さを指します。通常、ベニアの審美性において明度が最も重要な要素となります。なぜなら、明度の不一致が生じると、観察者が色相や彩度の微細な違いに気づく前に、歯全体の見た目の明るさ、奥行き、幅、そして視覚的な調和が変化してしまうからです。.
明度の高いベニアは、白っぽく見えたり、大きすぎたりして見えることがあります。一方、明度の低いベニアは、灰色っぽく見えたり、奥行きがなくなったりして見えることがあります。そのため、一般的には、まず明度を選び、次に彩度、最後に色相を決めるのが良いでしょう。.
シェードタブは、歯全体の色調を命名するための標準化された視覚的基準ですが、ベニアの明度グラデーション、半透明性、歯台色の影響、レジンセメントの効果、表面の質感、蛍光、オパール光、あるいは歯の各3分の1の領域が光を反射・透過する様子などを完全に表現することはできません。.
したがって、処方箋には、シェードタブの写真、書面によるシェードマップ、スタンプシェード、セラミックの厚み、材料の選択、質感に関する指示、および患者が承認した光学的な目標値を含める必要があります。.
信頼性の高いベニアの色調選定は、管理された臨床プロセスであり、まず明度、次に彩度、そして色相の順に記録し、さらに標準化された写真、残根の色調、セラミックの厚さ、材料の半透明度、表面の質感、照明条件、およびレジンセメントによる試着情報を加えることで、歯科技工所には単なる1つのコードではなく、光学的な処方箋が提供されるようにする。.
色調の選定は、著しい脱水が起こる前に行う必要があります。選定した色見本は、歯と同じ平面上で撮影し、各歯冠形成には個別の歯台色調記録を作成する必要があります。.
ベニアに最適なシェードガイドとは、臨床医が明度を予測可能な形で体系化し、命名されたシステムを明確に伝達し、校正済みの写真や測定機器を用いて結果を確認できるシステムである。多くのワークフローにおいて、VITA 3D-Masterは、そのグループが彩度や色相よりも明度を優先して構成されているため、有用である。.
VITA Classicalは依然として広く認知されていますが、いずれのシステムも、シェードマッピング、標準化された写真撮影、歯根部のシェード記録、および実験室での検証に取って代わることはできません。.
レジンセメントは、半透明のベニアの最終的な色調を変化させることのできる薄い光学層ですが、セラミックの質、不透明度、厚さ、あるいは基底歯の処理計画に根本的な問題がある修復物を確実に救うことはできません。特に、ベニアの厚さが約0.3~0.5ミリメートルの場合にはなおさらです。.
接着を行う前に、トライインペーストを使用してセメントの選択肢を比較してください。セメントを、不適切に製作された修復物の土壇場での修正手段として扱わないでください。.
次回のベニアの依頼を送る前に、「A1」や「BL3」だけと記入するのはやめてください。“
中間1/3の値を記録する。頸部の色調をマッピングする。最終的な色調およびすべてのスタンプシェードを撮影する。希望する半透明度、ハロー、質感、光沢を明記する。セラミックの厚さと提案するレジンセメントを確認する。患者が承認した内容を歯科技工所に提示する。.
そこで、たった一つの簡単な質問をしてみてください:
この修復物はタブと一致させるべきでしょうか、それとも患者の歯列に組み込むべきでしょうか?
技術資料の審査、シェード記録の評価、または前歯部の試作計画については、スキャンデータ、写真、歯台部のシェード、および処方箋を以下を通じてご提出ください。 アーティスト・デンタル・ラボの相談ページ.