What Veneer Case Photos Reveal About a Lab’s True Esthetic Skill
Photos expose skill.
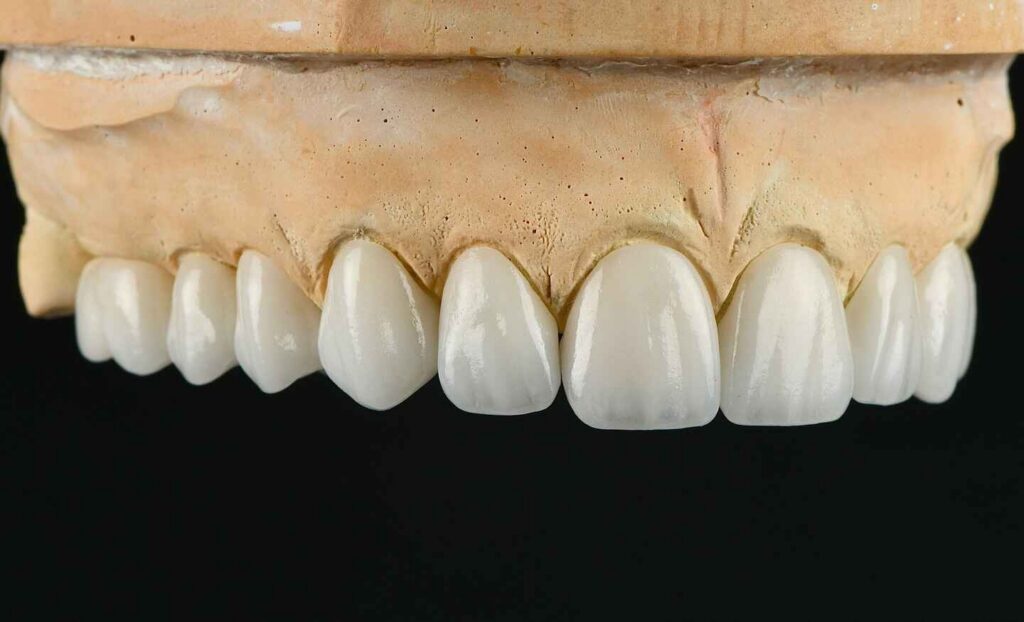
When I evaluate veneer case photos, I am not primarily asking whether the teeth look white or whether the photograph has dramatic contrast; I am looking for evidence that the laboratory understands proportion, value, translucency, line angles, texture, incisal character, gingival integration, and how all of those variables behave together rather than individually.
Pretty teeth are easy.
Believable teeth are not.
So what should a dentist, dental laboratory, DSO, or sourcing team actually look for when reviewing a cosmetic dental lab portfolio?
The answer is uncomfortable because it eliminates many of the shortcuts used in dental marketing.
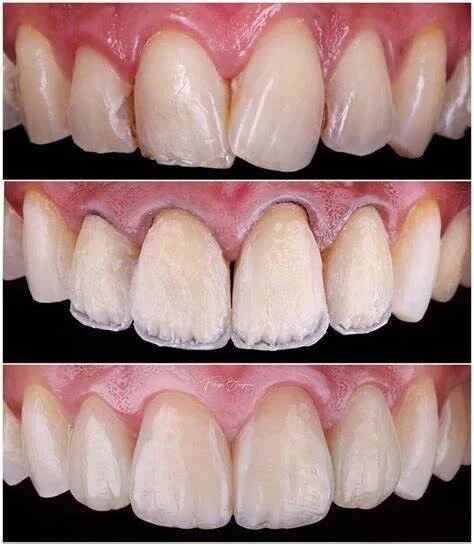
A beautiful porcelain veneer before and after image can demonstrate something useful, but only if you know what the photograph is capable of proving—and what it can hide.
My working rule is simple: good veneer case photos should survive inspection, not just create an immediate emotional reaction.
That distinction matters.
What Veneer Case Photos Reveal About a Lab’s True Esthetic Skill
Veneer Case Photos Should Show Control, Not Just Whiteness
The weakest way to evaluate dental lab veneer cases is to ask, “Does this smile look good?”
That question is too broad.
A technically mediocre case can look impressive when photographed from a forgiving angle, shot under diffuse frontal lighting, retouched aggressively, displayed at smartphone size, and compared with an unattractive preoperative photograph.
Instead, I break the case into separate visual problems.
Look at Value Before Shade
The first thing I inspect is value—the relative lightness or darkness of the restorations.
An A1 veneer can still look wrong.
A BL2 restoration can look perfectly natural in the right face.
Printed shade codes do not explain everything because the visible restoration is the product of ceramic opacity, thickness, underlying stump color, resin cement, facial contour, surface gloss, lighting, hydration, and surrounding teeth.
That is why the site’s discussion of why veneer shade can appear different after bonding is useful when assessing case galleries. A photograph showing a bright restoration does not automatically prove that the technician missed the selected shade. The apparent problem may instead be value, surface reflection, ceramic thickness, substrate influence, or inconsistent photographic conditions.
Look closely at the central incisors.
Does one appear slightly brighter?
Does the cervical third become unnaturally opaque?
Does the facial surface throw one broad white reflection?
Those details tell me far more about veneer laboratory quality than the shade name written on the prescription.
Look for Color Zoning, Not a Single Flat Color
Natural anterior teeth rarely behave like solid-color ceramic tiles.
The cervical third may carry greater chroma.
The middle third often determines the dominant value.
The incisal third can contain lower-value translucent zones, halos, mamelon effects, opalescent behavior, fine craze lines, or subtle irregularities.
A sophisticated esthetic dental laboratory understands this distribution.
A weak one often produces the same brightness from gingival margin to incisal edge.
That creates what I call the “white keyboard” effect: every tooth is technically clean and visually dead.
The Incisal Edge Is Where Average Ceramic Work Gets Exposed
I spend disproportionate time studying incisal edges.
Why?
Because this is where ceramic has fewer places to hide.
A strong veneer case may show restrained translucency, fine internal variation, an irregular but intentional halo, slight differences between central and lateral incisors, and edge morphology that works with the patient’s age and existing dentition.
A weaker case frequently shows one of four patterns:
Completely opaque incisal edges
Identical blue-gray translucency on every tooth
Thick white halos copied across the entire anterior segment
Artificially sharp edges with no optical transition
None of those automatically proves bad fabrication.
But repetition matters.
If ten completely different patients all receive the same incisal fingerprint, I am no longer looking at patient-specific characterization.
I am looking at a laboratory style template.
And style templates are dangerous when they start replacing observation.
Surface Texture Is One of the Best Tests of True Esthetic Skill
Shade attracts attention.
Texture earns credibility.
Natural enamel is not uniformly smooth, nor should every veneer be covered with dramatic grooves simply to demonstrate that it was handmade.
Real surface control is more restrained.
The technician must manage macro-contour, secondary anatomy, transitional line angles, tertiary texture, and final gloss without allowing any one of them to dominate.
On a natural-looking central incisor, the reflected-light zone should usually have structure. It may narrow, broaden, soften, or break depending on facial contour and illumination.
If every veneer produces the same wide vertical white stripe, I become suspicious.
Why?
Because the restoration may be too flat, too convex, excessively glazed, or missing transitional anatomy.
The result can photograph beautifully from one angle and collapse visually when the patient moves.
That is where a strong case portfolio separates itself from Instagram dentistry.
Tooth Proportion Is Harder to Fake Than Color
One of the most useful things veneer case photos reveal is whether the laboratory understands proportion.
The width-to-length relationship of the maxillary central incisors affects dominance, apparent age, facial character, and the overall rhythm of the smile.
But there is no universal magic ratio.
That is an important point.
A laboratory that mechanically forces every central incisor into the same proportion is not demonstrating esthetic discipline. It is demonstrating dependence on a template.
The better question is whether the teeth make sense in that particular face.
Artist Dental Lab’s article on how veneer width-to-length ratio changes smile character examines why physical dimensions and optical width are not the same thing. Transitional line angles can make a veneer appear narrower or wider even when its actual mesiodistal dimension barely changes.
This is precisely what I look for in veneer case photos.
Check the Centrals First
The central incisors usually carry the visual weight of the smile.
Ask:
Are they dominant without becoming oversized?
Do they mirror each other too perfectly?
Are the incisal edges aligned with the lower lip?
Are the line angles symmetrical where they should be?
Is one central visually wider because its reflection zone is broader?
A 2026 eye-tracking study involving 189 participants manipulated several dentolabial variables, including buccal corridor widths of 5%, 10%, 15%, and 25%, occlusal-plane angles of 0°, 2°, 4°, and 6°, dental-midline deviations up to 3 mm, and gingival display from −2 mm to +4 mm. Greater deviations tended to reduce esthetic ratings, while pronounced asymmetries generated repeated visual attention.
That finding reinforces something experienced esthetic observers already sense intuitively: the eye keeps returning to inconsistencies.
The viewer may not say, “The dental midline is displaced 2.5 mm.”
They simply say, “Something looks off.”
A skilled laboratory learns to identify the cause before ceramic is finalized.
What Strong and Weak Veneer Case Photos Usually Reveal
I use the following framework when comparing a best dental lab for veneers against a portfolio that merely photographs well.
What to Inspect
Strong Esthetic Evidence
Warning Sign
Central incisor value
Controlled and balanced with the face
Chalky, excessively dominant brightness
Cervical third
Natural chroma progression
Same color from cervical to incisal
Incisal translucency
Localized and case-specific
Identical blue or gray band on every case
Surface texture
Visible under directional light but restrained frontally
Deep repetitive grooves
Line angles
Control apparent width and symmetry
Flat or over-broad reflection
Tooth proportion
Works with lips, face, and adjacent teeth
Same tooth library repeated across patients
Embrasures
Progressive and natural
Identical spacing between every tooth
Gingival integration
Margins visually quiet
Dark margins, bulky cervical contour, asymmetry
Lateral incisors
Support central dominance
Same size and visual weight as centrals
Canines
Transition naturally in chroma and form
Bleach-white canines identical to centrals
Surface gloss
Enamel-like reflection
Uniform mirror glaze
Photography
Repeatable lighting and orientation
Dramatic but inconsistent editing
Case variety
Single units, multi-unit cases, different substrates
Only forgiving full-arch whitening cases
The last row deserves more attention than it usually gets.
The Best Portfolio Is Not the One With the Most Perfect Cases
A gallery filled with ten-unit bleach-shade veneer cases tells me less than most buyers think.
Those cases can demonstrate consistency.
But they are not always the hardest esthetic test.
I want to see difficult cases.
Show Me a Single Central Incisor
Matching one central incisor against an untouched contralateral tooth is brutal.
The new restoration must reproduce:
Value
Hue
Chroma
Translucency
Facial convexity
Line-angle position
Incisal effects
Surface texture
Gloss
Apparent width
Wear pattern
There is nowhere to distribute the mismatch.
If I am trying to evaluate a lab’s true esthetic skill, a convincing single-central case can tell me more than twenty uniform smile makeovers.
Show Me a One-Unit Remake Inside an Existing Veneer Case
This is even more revealing.
Existing ceramic has already accumulated its own optical identity. The replacement veneer has to match not only a shade target but also the contour, aged surface finish, light reflection, characterization, and visual rhythm of the surrounding restorations.
A lab that can handle this consistently is demonstrating observational discipline.
Not just fabrication capacity.
Show Me Different Starting Conditions
I also want to see variation:
Natural enamel-dominant cases.
Dark substrates.
Restored teeth.
Different tooth proportions.
High smile lines.
Older patients.
Younger patients.
Male and female facial forms.
Feldspathic cases.
Lithium-disilicate cases.
Minimal-prep cases.
More heavily prepared teeth.
Why?
Because the exact same veneer design should not appear on every patient.
What Veneer Case Photos Reveal About a Lab’s True Esthetic Skill
Photography Quality Matters—But Expensive Cameras Do Not Automatically Mean Better Evidence
Here is a hard truth for anyone evaluating porcelain veneer before and after galleries:
A beautiful photograph is not automatically an accurate photograph.
Camera processing can change exposure, white balance, contrast, sharpening, saturation, shadows, and local brightness.
Phones now perform substantial computational processing automatically.
DSLR files can be manipulated just as aggressively afterward.
So I care less about whether the laboratory says “DSLR photography” and more about whether its protocol appears controlled.
A 2026 systematic review from researchers affiliated with the University of Hong Kong included eight studies comparing smartphone and DSLR methods for dental shade assessment: three in vivo studies, three in vitro studies, and two using both settings. Seven used CIELAB color difference measurements. The reviewers found no consistent device winner and emphasized standardization of lighting, calibration, camera settings, and image acquisition.
That finding matters.
The camera is not the skill.
The protocol is.
A separate 2024 study of calibrated digital dental photography reported high consistency, with Cronbach’s α values of approximately 0.94–0.96 for its calibrated “capture to edit” workflow, supporting the value of controlled photography for comparative color mapping even though discrepancies from spectrophotometric measurement remained.
And a systematic review and meta-analysis examining multiple shade-selection methods found that digital photographic shade matching reduced color difference compared with conventional visual approaches in the included evidence, with the photographic subgroup showing a statistically significant improvement.
The lesson is not “buy a better camera.”
It is “control the variables.”
How I Judge Whether Veneer Case Photos Are Credible
When I evaluate a lab gallery, I look for repeatability.
Not perfection.
1. Are Before and After Photos Taken From Similar Angles?
If the preoperative photograph is taken low and close while the postoperative image is taken higher, farther away, and with a longer focal length, proportions become difficult to compare.
The improvement may be real.
But the documentation is weak.
2. Is Lighting Consistent?
One case photographed under warm ambient light and another under strong cross-polarized flash cannot be directly compared for shade quality.
A serious gallery should distinguish between photographs intended to show color and photographs intended to show surface morphology.
3. Are There Retracted Views?
Full-smile portraits are excellent for evaluating facial integration.
They are terrible for inspecting margins, contact zones, texture, cervical transitions, and individual unit consistency.
I want both.
4. Are Close-Ups Too Perfect?
Aggressive skin smoothing is obvious.
Aggressive ceramic editing can be harder to spot.
Watch gingival texture, tiny highlights, saliva reflections, incisal edges, and neighboring enamel. If local detail disappears selectively around the restorations, I become cautious.
5. Does the Portfolio Show the Same Ceramic Personality Every Time?
This is my favorite test.
Look through ten cases quickly.
Do they all have the same central-incisor shape?
Same incisal halo?
Same horizontal texture?
Same embrasure progression?
Same bleach value?
Same perfectly rounded lateral incisors?
If yes, the laboratory may be technically competent.
But I would question whether it is designing patients or reproducing its house style.
A Lab’s Esthetic Skill Also Depends on What the Clinic Sends
There is another uncomfortable issue.
The laboratory cannot fabricate information it never receives.
You cannot send “A1, natural, slight translucency” and later complain that the restorations lack individual character.
That prescription leaves the technician guessing about:
A technician may have exceptional ceramic instincts, but no amount of artistry can reconstruct a stump shade that was never photographed or a lip position that was never documented.
So when judging veneer laboratory quality from a failed case photograph, I always ask a second question:
What information did the lab receive?
That is fairer—and more useful—than automatically blaming the ceramic bench.
Case Photos Cannot Prove Everything
This is where marketing and procurement often part ways.
Case photos can reveal esthetic judgment.
They cannot fully prove fit, bonding quality, mechanical reliability, occlusal accuracy, marginal integrity, or long-term survival.
A restoration can photograph beautifully on delivery day and still be poorly engineered.
Conversely, a clinically excellent restoration can look mediocre in a badly exposed photograph.
Research into porcelain laminate veneers illustrates why these issues should remain separate. A systematic review examining 30 clinical publications reported generally high success and predictable outcomes for porcelain laminate veneers while also noting substantial heterogeneity in study designs and limited evidence extending beyond 20 years.
So I would never select an esthetic dental laboratory from Instagram-style photographs alone.
I would use the photographs as one evidence layer.
Then I would evaluate workflow.
How to Evaluate a Dental Lab Beyond Its Veneer Gallery
If you are seriously comparing laboratories, request more than hero shots.
Ask for:
Full-face postoperative photographs
Retracted postoperative photographs
Macro views of central incisors
Oblique-light images showing texture
Cross-polarized images where available
Single-unit anterior cases
Multi-unit veneer cases
Dark-substrate cases
Cases using different ceramic systems
Cases photographed several weeks or months after delivery
Example veneer prescriptions
Stump-shade communication examples
Example correction or remake workflows
Then ask technical questions.
What ceramic was used?
What thickness range was involved?
Was the case monolithic, cut-back, or fully layered?
How was the stump shade communicated?
Was the final texture glazed, mechanically polished, or both?
Which design reference received final approval?
Was the patient photographed before dehydration?
What happened when one unit did not match?
A lab that answers those questions specifically is far more interesting to me than one that says, “We make premium veneers.”
Premium is a marketing adjective.
Process can be inspected.
The Red Flags I Would Not Ignore
Some warning signs are obvious.
Others are surprisingly common.
Every Case Is Bleach White
There is nothing inherently wrong with high-value veneers if that is what the patient wants.
But if a laboratory portfolio contains almost nothing else, I cannot evaluate its ability to match natural dentition.
Every Case Uses Heavy Texture
Texture is not synonymous with artistry.
Sometimes subtlety requires more control.
There Are No Single-Unit Cases
That does not prove weakness.
But it removes one of the most useful tests of esthetic matching.
All Photos Use Dramatic Filters
A portfolio should document dentistry, not hide it.
No Material Information Is Provided
Feldspathic porcelain, lithium disilicate, and zirconia do not offer identical optical behavior.
If every case is presented simply as “premium porcelain,” useful technical information has been removed.
The Teeth Look More Similar to Each Other Than the Patients Do
That is the biggest warning sign.
Good esthetic dentistry should contain fingerprints of the patient.
Not just fingerprints of the laboratory.
What the Best Dental Lab for Veneers Should Be Able to Demonstrate
The best dental lab for veneers is not necessarily the laboratory with the whitest portfolio, the most dramatic photography, or the longest list of celebrity-style smile transformations.
I would look for five things.
Optical Judgment
The lab understands value, translucency, opacity, chroma, stump influence, cement influence, and surface reflection.
Morphologic Judgment
The lab controls proportion, line angles, facial contour, embrasures, incisal edge position, and tooth dominance.
Material Judgment
The lab does not prescribe the same ceramic for every substrate and every functional situation.
Photographic Discipline
Case photographs are repeatable enough to allow meaningful comparison.
Communication Discipline
The technician asks for missing records instead of quietly inventing them.
That final quality is underrated.
Sometimes the most skilled answer a laboratory can give is:
“We need another photograph before we proceed.”
FAQs
What do veneer case photos reveal about dental lab quality?
Veneer case photos reveal a laboratory’s visible control of tooth proportion, value, translucency, surface texture, incisal characterization, line angles, symmetry, gingival integration, and patient-specific design, while also showing whether its esthetic results remain convincing under close-up, retracted, facial, and directional-light photography rather than only in highly polished smile portraits.
They are therefore valuable for screening an esthetic dental laboratory, but they should be combined with information about material selection, case communication, fit, QC, and long-term workflow.
How can I tell if porcelain veneer before and after photos are high quality?
High-quality porcelain veneer before and after photos use comparable camera angles, repeatable exposure, controlled white balance, consistent magnification, natural facial framing, retracted clinical views, and enough resolution to inspect cervical transitions, incisal effects, surface texture, line-angle reflections, symmetry, and adjacent teeth without depending on dramatic filters or misleading changes in perspective.
The best galleries usually show several photographic views rather than relying on one flattering full-smile image.
What should I look for in dental lab veneer cases?
Dental lab veneer cases should demonstrate believable central-incisor proportions, controlled value, case-specific incisal translucency, restrained surface texture, natural embrasure progression, appropriate lateral-incisor and canine character, consistent gingival integration, and enough variation between patients to prove that the laboratory is designing each smile individually rather than repeatedly applying one standard tooth library.
I would give extra weight to single-central restorations, one-unit replacements, dark substrates, minimal-prep cases, and restorations matched against natural teeth.
Are very white veneer photos evidence of a skilled cosmetic dental lab?
Very white veneer photos are evidence of a selected esthetic outcome, not proof of superior cosmetic dental lab skill, because high-value ceramic can still have poor proportion, excessive opacity, flat facial contour, uniform gloss, generic texture, weak incisal characterization, or inappropriate integration with the patient’s lips, gingiva, face, age, and remaining natural dentition.
The harder test is whether the laboratory can create both bright cosmetic cases and subtle restorations that disappear beside natural teeth.
Can veneer case photos prove that a dental laboratory makes durable restorations?
Veneer case photos cannot prove long-term durability because photographs mainly document visible esthetic outcomes at a particular moment, while restoration survival also depends on preparation design, enamel availability, bonding, ceramic thickness, occlusion, parafunction, cementation technique, marginal quality, patient behavior, material selection, and clinical maintenance that may not be visible in a portfolio image.
Use photographs to judge visible esthetic discipline, then investigate clinical workflow and technical quality separately.
How do I evaluate a dental lab before sending my first veneer case?
Evaluating a dental lab before sending a veneer case means reviewing varied case photography, examining single-unit and multi-unit anterior work, asking which ceramic systems were used, checking how stump shade and photographic records are communicated, reviewing prescription requirements, understanding correction procedures, and testing whether technicians ask specific questions when submitted records are incomplete or contradictory.
A controlled trial case is generally more informative than judging a supplier from marketing claims alone.
Do smartphones or DSLR cameras produce better veneer case photos?
Smartphones and DSLR cameras can both produce useful veneer documentation when lighting, calibration, exposure, distance, orientation, and image processing are standardized, and current research does not support assuming that one camera category will automatically produce more accurate dental shade information regardless of how the photograph is captured, calibrated, processed, displayed, and interpreted.
For laboratory evaluation, consistency of the photographic protocol is more valuable than the camera badge.
What is the biggest warning sign in a veneer laboratory portfolio?
The biggest warning sign in a veneer laboratory portfolio is excessive repetition across unrelated patients, where central-incisor shapes, bleach values, incisal halos, texture patterns, embrasures, lateral-incisor proportions, and surface gloss appear nearly identical from case to case, suggesting that a house-style template may be replacing patient-specific observation and case-by-case esthetic judgment.
Consistency is desirable; sameness is not.
Your Next Step: Test the Lab With a Case That Actually Reveals Skill
Do not choose a veneer laboratory because one ten-unit makeover looked impressive on a phone screen.
Study the centrals.
Zoom into the incisal edges.
Follow the reflections.
Compare cervical value.
Look at line angles.
Inspect the surface under oblique light.
Find the single-unit cases.
Look for patients who do not all receive the same tooth design.
And ask what information produced the result.
That is how I would evaluate veneer case photos.
If you are currently comparing laboratory partners, send Artist Dental Lab a representative anterior case with the available STL files, stump-shade records, shade photographs, smile references, and esthetic objectives through the Artist Dental Lab case inquiry page. Use the first case as a technical test: evaluate not only the finished veneers, but also the questions the technician asks before fabrication begins.